[Contents] [Previous] [Next] [Last]
This chapter gives the basics of building applications with Visual JavaScript. The chapter includes a step-by-step example of building and testing a simple application and introduces the sample applications that are provided with Visual JavaScript.
Visual JavaScript makes it easy to create powerful web applications by allowing you to concentrate on designing the user interface (UI) of the application. You can then use Visual JavaScript tools to automate the process of creating interactions, behavior, and data access.
Visual JavaScript creates and updates the source code as you create the layout. It is possible to design, develop, and build an application without writing any code. This represents a dramatic breakthrough in productivity for web application developers.
When you start Visual JavaScript, you can load an existing project or create a new one. (See "Starting Visual JavaScript.") To build an application, you must add pages to the project, add components to the pages, edit and connect the components, and deploy the project files to a server. (See "Overview of Application Development.")
To help you get the hang of using the different tools, this chapter provides a step-by-step example of building a small crossware application. (See "Trying an Example.") In addition, a number of sample projects are included to illustrate different techniques. (See "Sample Applications.")
Starting Visual JavaScript
You can start Visual JavaScript just as you start any application in your environment. For example, in a Windows environment do this:
NOTE:
For installation information specific to your platform, refer to the README.TXT
file in the installation directory. §
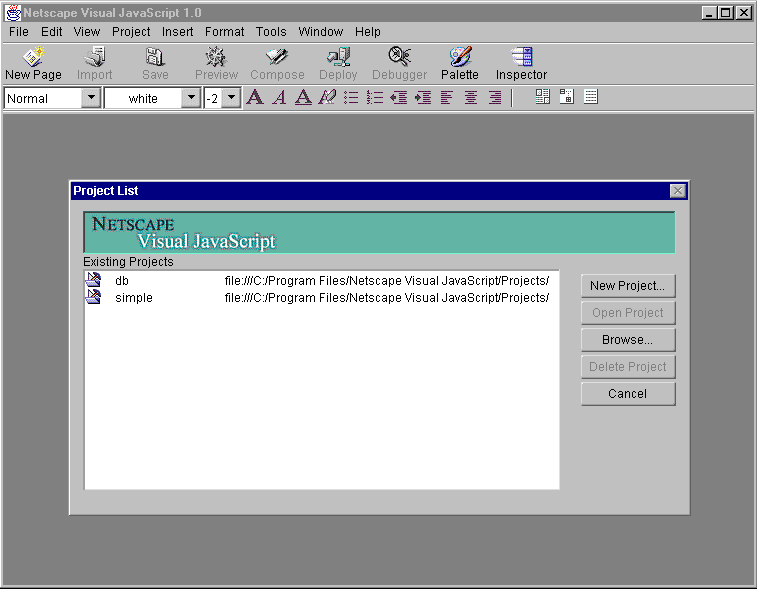
The Visual JavaScript main application window appears, displaying the menu bar and toolbar at the top. The workspace contains a dialog box that allows you to create a new project or open an existing one, as shown in Figure 3.1.
Figure 3.1 The Visual JavaScript main application window on start-up
Overview of Application Development
Before you launch into the details of development, it is important to get a high-level view of what is required. Here is an overview of the basic steps involved in creating web applications with Visual JavaScript:
Creating a New Project
In Visual JavaScript, projects organize all the source files that make up your applications, providing vital structure to your applications as they grow more complex. The project file (.prj) does not actually contain the source files; it simply keeps track of their location. Visual JavaScript allows you to create an application only within the project environment. It is recommended that you create a separate directory for each new project you create.
To create a new project on first starting Visual JavaScript, click New in the Open Projects dialog box. If you have previously started Visual JavaScript and closed this dialog box, choose New Project from the File menu.
The New Project dialog appears as shown in Figure 3.2, containing a default project name, and directory and deployment location based on where you installed Visual JavaScript.
Figure 3.2 The New Project dialog containing default project information
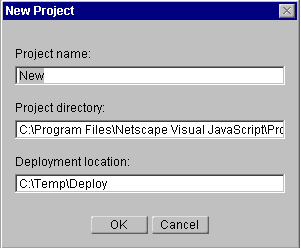
Follow these steps to create a new project using the dialog box:
- In the Project Name field, type the project name you want.
- Type the location where you want the new project files to be created, if it is different from the default value.
- Type the URL or path of the location to which you want your project files deployed when the project is ready for final testing and delivery, if it is different from the default value.
- Click Finish.
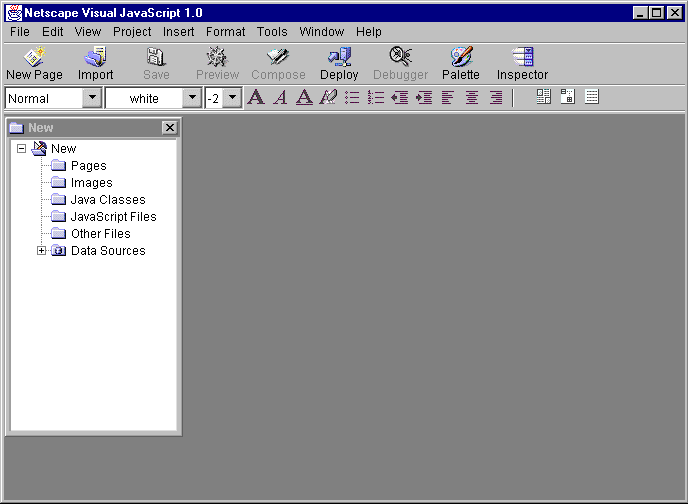
The project you created appears in the Project window, as shown in Figure 3.3. You can examine and change the properties of the project by double-clicking it to bring up the Inspector.
Figure 3.3 The new project displayed in the Project window
Adding Pages to a Project
You can add pages to a product by creating new, blank pages, by importing existing pages from other projects, or by using the Database Application Wizard to build pages automatically. (See "Using the Database Application Wizard" for more information.)
To add a new, blank page to your project, do any of the following:
A dialog box appears allowing you to create a new page. You can create a page based on a page template, or allow the Database Application Wizard to create pages automatically. To create a blank page, select Blank Page Template and click OK.
The blank page appears in the Project window and is also displayed in the Page Editor, as shown in Figure 3.4. By default, the new page's name is Page1.html. To change the default page name, do one of the following:
Editing a Page
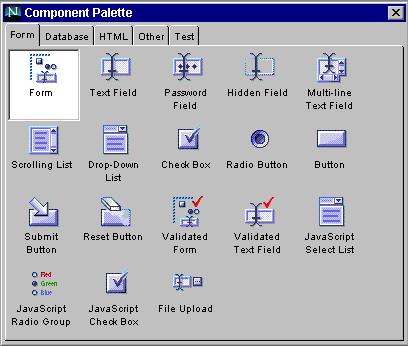
Double-click a page in the Project window to display and edit it in the Page Editor. To add a component to a page, select the component in the Component Palette (as shown in Figure 3.5), then drag and drop it onto the Layout view in the Page Editor, or onto the tree structure in the Structure view.
You can also add an HTML tag or block to a page by selecting it from the Insert menu.
Figure 3.5 Selecting a component in the Component Palette
You can specify and change the appearance of a visual component by setting its properties in the Inspector. Double-click the component in the Page Editor to bring up a new Inspector, or, if the Inspector is already active, select the component to see its properties.
Specifying Behavior by Connecting Components
The Connection Builder allows you to connect client-side components into an application that responds to user events, such as mouse clicks or text entry, with the behavior that you specify. Using the Connection Builder you can:
When you are specifying connections, the source component is one in which an event originates--such as a button that the user clicks. The target component is one that reacts to the event, either by changing a property or calling a method.
Testing the Application
When you have finished editing your page and adding components to it, click Preview on the toolbar to display it in Netscape Navigator. You can see how client-side components are displayed and test client-side behavior.
The Preview command loads pages without any server-side processing. If your page contains server-side components, the code for them is displayed when the page is previewed.
If the application contains server-side components, deploy it to the Enterprise Server for testing by clicking Deploy on the toolbar. Deployment copies the project files to the server, compiles server-side JavaScript, and installs or restarts the application as necessary. When you deploy the application, a dialog box allows you to run the application with specified debugging options.
To run an application, choose Run from the Project menu.
Trying an Example
Before delving into the details of how each Visual JavaScript module works, try to create a simple application of your own. In the following example, you create a new project and application that registers guests--an online guestbook. After building and testing the client-side portion of the application, you add server-side logic to handle the values entered in the form.
Creating the Project
The first step is to create a new project.
- Choose New Project from the File menu.
- For the Project Name, type
Guestbook. Click Finish.
The new Guestbook project appears in the Project window.
- Click New in the toolbar to display the Create a New Page dialog box.
- Select Blank Page Template and click OK.
The new page (Page1.html) appears in the Project window and is displayed in the Page Editor.
- Right-click
Page1.html in the Project window and choose Rename to change the name of this page. Rename the page guestbook.html.
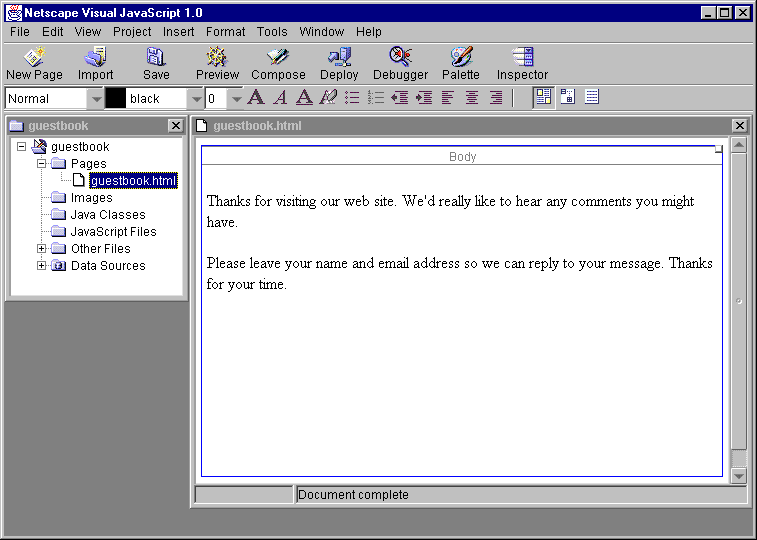
- In the Page Editor, click in the body of the page and type a few introductory paragraphs. A paragraph has a blue border when active.
Your page should now look something like the page shown in Figure 3.6.
Figure 3.6 The Guestbook page
Adding a Form and Table
Next, you will add form and table components to the page.
- Click Palette in the toolbar to display the Component Palette.
- Select the Form tab on the Palette.
- Drag the Form component from the Palette to the last paragraph on your page in the Page Editor.
- Select the HTML tab of the palette and drag the Table component to the form you just created.
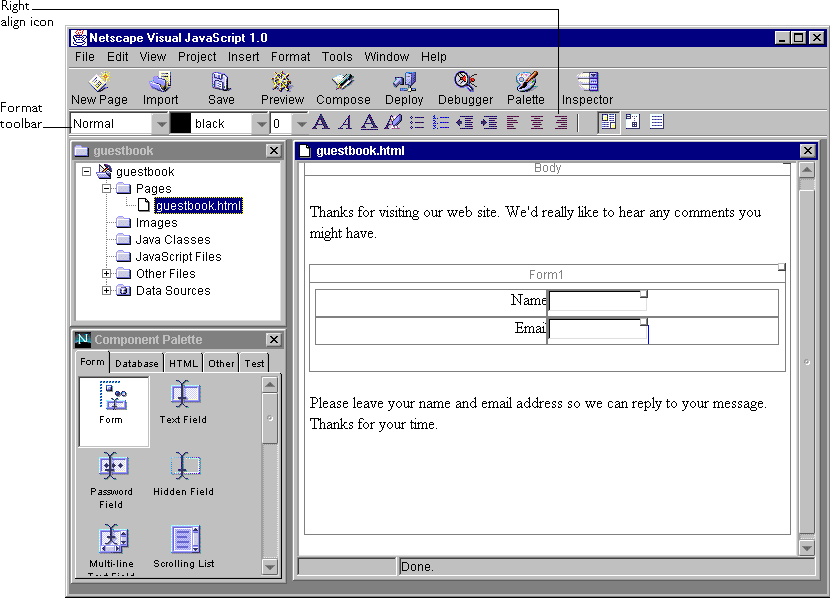
A two-by-two table appears on the form. (Note that the Form component is highlighted with a blue outline when you position the cursor over it.)
- Click inside the two left table cells and type
Name and Email, respectively. Click the right-alignment icon in the format toolbar or choose Align and then Right from the Format menu to make the text right-aligned.
- Return to the Form tab of the palette and drag the Text Field component to each of the two remaining empty cells in the table.
Notice that the table cell contains the blue edit cursor when you are dropping the component in the right place. If you have trouble with this step, check that you did not drop the component when the entire table was highlighted.
Your page should now look like the one in Figure 3.7.
Figure 3.7 The Guestbook page with a form and table
Adding a Comment Area
Now add an area where the user can type comments.
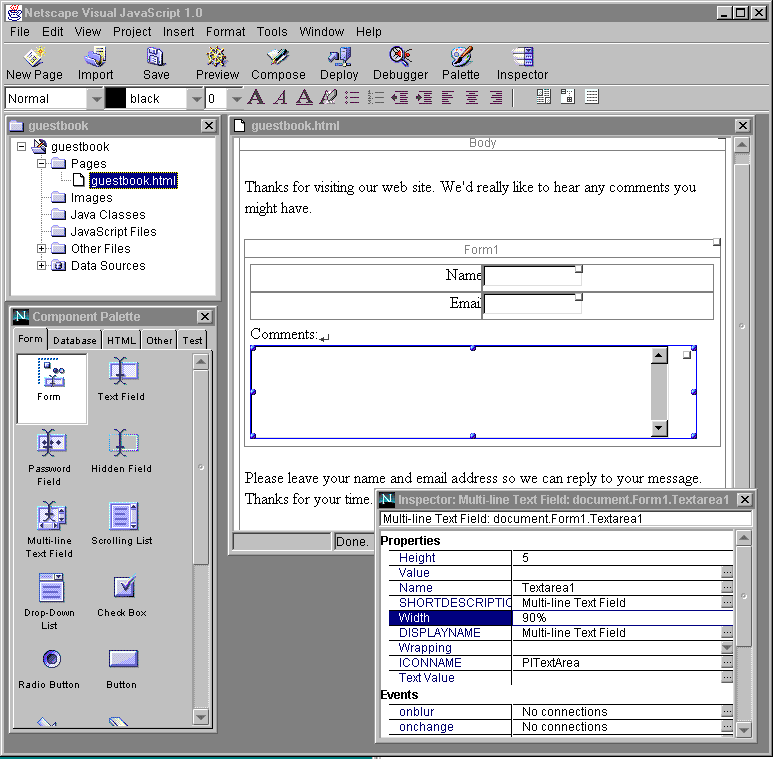
- Click to place the edit cursor after the table but still inside the form, then type the word "Comments:" followed by a line break (Shift-Return).
- From the Palette, drag the Multi-line Text Field component to just after the table but inside the form border.
- Click the new text field component to select it. Notice that resize handles appear around the edges of the box. Click the bottom-middle handle and drag it to resize the box, making it larger vertically.
- Double-click the text field component in your page to display it in the Inspector. The number shown as the value of the
Height property corresponds to the number of lines you added when you resized the box.
- Set the
Width property to 50. The text field resizes itself to the width of 50 characters.
The page now has a comment area, as shown in Figure 3.8.
Figure 3.8 The Guestbook page with a comment area
Adding and Configuring Buttons
You will now add buttons that the user can click to send their comments or to clear the form.
- Add a new paragraph after the text field by clicking after the text area and pressing Enter. (Sometimes it is easier to use the left and right arrows to move the cursor around objects on the page.)
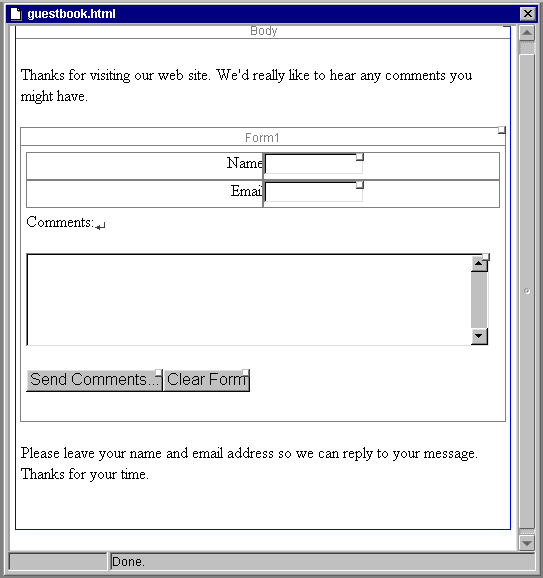
- From the Component Palette, drag a Submit Button and a Reset Button component to the paragraph you just added.
- Use the Inspector to change the
Button Label properties to "Send Comments..." for the Submit Button, and "Clear Form" for the Reset Button.
The buttons appear as shown in Figure 3.9.
Figure 3.9 The Guestbook page with buttons
Adding Simple Behavior
To connect the Send Comments button requires some server-side processing. You will learn how to do that later. Right now, you will connect some components on the client side to see how easy it is to use the Connection Builder and the built-in connection types.
- Drag a Nervous Text component from the Other tab of the Component Palette to the end of your page. This is an applet that makes text appear to jiggle on the screen.
- Click the box in the upper-right corner (the connection point) of the text box labeled Name, and drag the cursor. The cursor changes to a "plug" icon to let you know that the tool is in connection mode.
- Drag the plug to the Nervous Text component. When the cursor is positioned correctly, the target component is highlighted by a green border.
- Drop the connector onto the Nervous Text component. The Connection Builder appears and displays information about the connection you are defining.
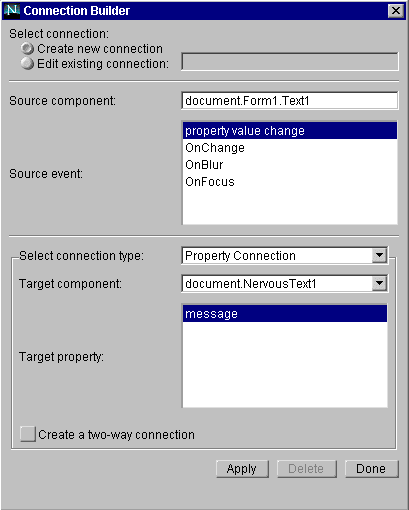
The Connection Builder (Figure 3.10) shows that you are making a property connection between the propertyValueChange event in the text box, and the Message property of the Nervous Text component. This means that when the user types something into the source component (causing the Value property to change), the value is automatically copied to the target property, Message, in the target Nervous Text component.
Figure 3.10 The Connection Builder showing the new property connection
- Click Apply to accept the default values and create the connection. Notice that the connection point in the text box is filled in, to indicate that the connection has been made.
- Save your changes by clicking Save on the toolbar or choosing Save from the File menu.
For more information on using the Connection Builder and on the different connection types, see "Connecting Components."
Previewing Your Page
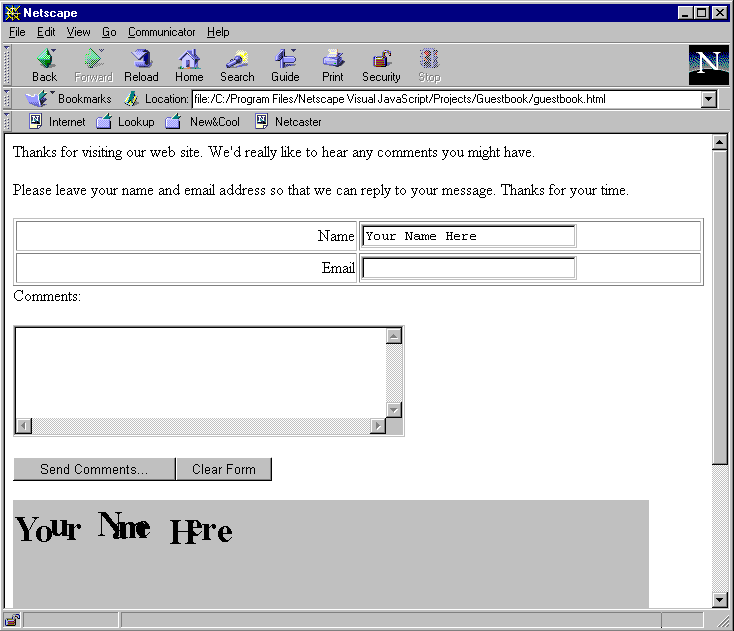
- Try your new page by clicking Preview. Your page should look something like the one shown in Figure 3.11.
- Enter your name in the name box and press Enter. The text immediately appears in the Nervous Text applet!
Figure 3.11 Preview of the Guestbook page
Adding an Action Page
The Submit Button component is automatically connected to the form that contains it. When you click the button, its click event calls the form's submit method. This method in turn requests the URL specified in the form's Action property, passing it the form values as parameters. To build in the behavior you want, you must have a page that uses those parameters and takes some action.
The guestbook page allows the user to send mail when the form is submitted. To take advantage of the parameters submitted with the form, put a Server Send Mail component on a page by itself, then connect the form to that page. The component will use the form values submitted with the form.
- Create a second page in the
guestbook project and name it SendComment.html.
- Drag a Server Send Mail component from the Other tab of the Component Palette to the new page.
- To connect the form to the new page, display both pages. Move the Page Editor windows so that you can see both the upper-right corner of the form and the action page.
- Click the connection point in the upper-right corner of the form and move the cursor. The cursor changes to a "plug" icon to show that you are in connection mode. Drag the plug and drop it onto a blank area of the action page.
- Click in the form to display it in the Inspector. The
Action property should now show the name of the action page.
- Change the
Method property of the form to Get.
When the form is submitted, it sends the values of the form elements as parameters in the server's request object. The Server Send Mail component must access some of those values, and you must also set some of its properties to fixed values.
- Display the Server Send Mail component in the Inspector.
- Set the
ToAddress property to your email address.
- Set the
Subject property to the string "Comments from guest".
- The
Body property must be a JavaScript expression that accesses the value from the text area on the form. To set the value, click the equal-sign (=) button by the property. The Expression Editor appears.
- In the Expression Editor, click the
request object. This is a server object that server-side JavaScript uses to pass the form values. Its properties appear on the right, including the _TextArea1 property, where the value for the Comment box is passed.
- Double-click
_TextArea1. The script to access the property value appears in the text box.
- Click Set Value. The new expression appears as the value of the
Body property in the Inspector.
- Save your changes by clicking Save on the toolbar or choosing Save from the File menu.
For more information on connecting and submitting forms, see "Connecting Forms."
Deploying and Compiling
Remember that you can preview only the client side. Because the Server Send Mail component runs on the server and must be compiled, you cannot actually send the mail from the preview. You must deploy and compile the application to test it. For testing purposes, you can deploy the sample application to your local Enterprise Server, where you can compile and run it.
- Click Deploy on the toolbar.
The Deploy Project to Server dialog box appears, as shown in Figure 3.12, allowing you to specify deployment information.
Figure 3.12 The Deploy Project to Server dialog box
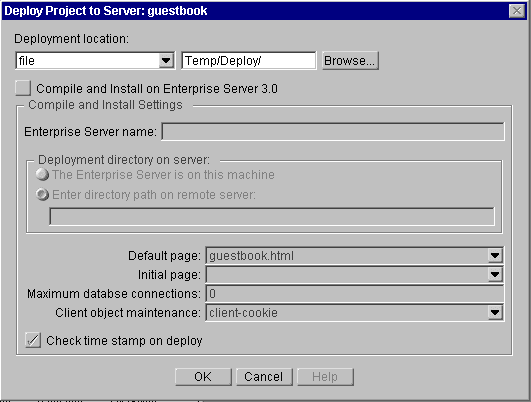
- Specify the deployment location. This is the path to a directory where you can copy the files for compilation.
- Select the "Compile and Install on Enterprise Server 3.0" check box. (If you are running Enterprise Server 2.x, you must manually compile the application. See "Compiling Applications Using Enterprise Server 2.x.")
- If you have an Enterprise Server on your local machine, you can deploy locally for testing: select the "The Enterprise Server is on this machine" radio button.
Otherwise, enter the path to the deployment location from the server machine. This might be slightly different from the path from your workstation.
- Click OK to deploy the application and compile. A message box appears if the compilation produces errors.
- Choose Run from the Project menu to run the compiled application.
For more information, see "Deploying and Compiling Applications."
Sample Applications
Sample projects containing sample pages and applications are installed with Visual JavaScript. These samples are designed to run with the LiveWire sample database. Refer to Appendix A of Writing Server-Side JavaScript Applications for information about creating the sample database.
Sample page templates appear in the New Page dialog box. You can use these templates to create pages of your own, or you can create your own page templates. (See "Creating Page Templates" for more information.)
In addition to the sample projects that are installed with Visual JavaScript, look for examples of add-on components and crossware applications in these documents:
[Contents] [Previous] [Next] [Last]
Last Updated: 11/19/97 12:44:53
Copyright © 1997
Netscape Communications Corporation


