[Contents] [Previous] [Next] [Last]
This chapter describes how to use Visual JavaScript to develop applications that access the data in your databases, both to display it to your users and to allow them to update or enter data. The chapter introduces the Database Application Wizard and discusses how you can use forms to display data.
In order to build database-access applications, you must identify your data sources, build a user interface, then connect the display to the data. The ways in which you make the connections depend on the components you use. (See "Overview of Data Access Applications.")
Rather than building your database-access pages individually, you can use the Database Application Wizard to generate them automatically. (See "Using the Database Application Wizard.") You can also choose to build parts of them by hand, and generate other parts automatically. (See "Using Forms in Database Applications.")
The db sample application that is provided with Visual JavaScript illustrates some of the many kinds of database-access pages that you can create. (See "Database Samples.")
Overview of Data Access Applications
To communicate with a relational database, your application must include the following database-access and display components:
You can use the Database Application Wizard to create a complete database application automatically. See "Using the Database Application Wizard." Alternatively, you can create and connect all or some of the pieces yourself. See "Using Forms in Database Applications."
Identifying Data Sources
You must identify the data sources you will be using before you begin creating the pages that access data from a database. Available data sources are listed under the Data Sources folder in the Project window. Once you identify a data source to Visual JavaScript, that source is available to any project that you load or create.
NOTE:
Data sources are maintained on the server, not on the Visual JavaScript client. §
When you click the "+" icon to open the Data Sources folder in the Project window, Visual JavaScript automatically retrieves any data sources that are known to the default server. (The default server is specified in the Server property of the project object.) You may need to enter a design-time user name and password to retrieve them.
Click the "+" icon to expand a data source in the Project window and see its tables; expand a table to see its rows. Database views are displayed as if they were tables. Right-click a data source in the Project window to bring up a context menu from which you can delete it or reload it.
Important
Deleting a data source removes it from the Data Source registry on the server;
any other users of the same server also lose access to the data source. §
Adding Data Sources
To begin adding a data source, do any of the following:
The Create New Data Source dialog box appears, as shown in Figure 6.1.
Figure 6.1 The Create New Data Source dialog box
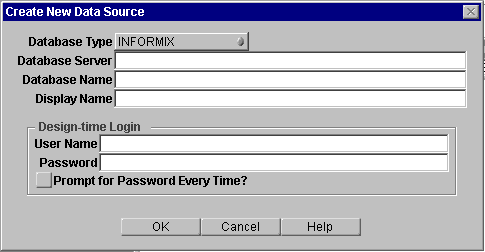
Complete the Create New Data Source dialog box as follows:
- To complete the Database Type field, choose a type from the drop-down list.
- Type a name in the Database Server field. Depending on the database type, identify the database server as follows:
- For Informix and Sybase databases, fill in the Database Name field. Leave this field blank for other database types. A value is generated for Display Name, but you can change it if you wish.
- Log in by completing the User Name and Password fields. Note that this is the design-time login, not the runtime login, which can be different. By default, Visual JavaScript remembers the design-time user name and password for a data source from session to session so that you need not enter it again. If you prefer to require password entry for each development session, select Prompt for Password Every Time.
- Click OK.
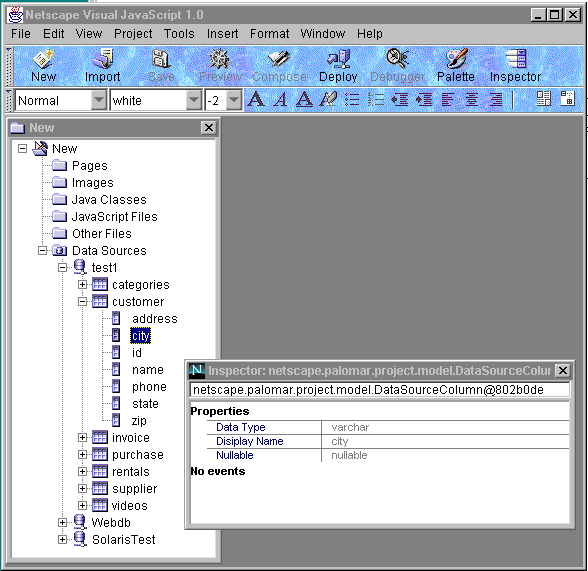
When you have successfully identified a data source, it appears under the Data Sources folder in the Project window. You can open it to see the tables and columns that are defined in it. You can inspect a column to see its data type, as shown in Figure 6.2.
Figure 6.2 Inspecting a column in a data source
Connecting to the Database
Different display components connect in different ways to get and update data. Table 6.1 shows how to make data connections for the built-in components.
Table 6.1 Connecting components to data
Many server-side data components (and JavaScript Client Cursor, which is partly server-side) connect to a data source by specifying a LiveWire DBPool component in their DBPool property. For example, if you have a LiveWire DBPool called DBPool1, set the DBPool property to DBPool1 for all the components that will get a connection from that pool.
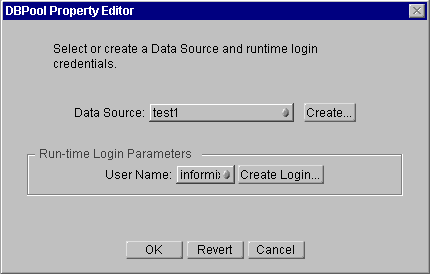
When you click the ellipsis (...) by a DBPool property, the DBPool property editor appears, as shown in Figure 6.3. This editor allows you to specify a data source to which the component should connect. If an existing LiveWire DBPool component matches your specification, it is set as the DBPool property value. Otherwise, a new DBPool component is created on the globals.html page and set as the DBPool property value.
Figure 6.3 DBPool Editor
The following components have the DBPool property:
Using the Database Application Wizard
The Database Application Wizard takes you step by step through the process of creating a database presentation in your application. Choose Database Application Wizard from the Tools menu to start creating your own database application.
In response, Visual JavaScript displays a series of dialog boxes, in which you answer questions about where to get the data from and what kind of presentation to use. You can choose the data source and the presentation style.
Data Source. To present data from a single database table or from two related database tables. (See "Master-Detail Applications" for more information.)
Presentation Style. There are three basic types of presentation:
See "Database Presentation Types" for more information.
The wizard automatically accesses the data sources you have identified. If you have not identified any data sources, the wizard prompts you to do so. The wizard then prompts you to choose the kind of display you want and to specify the details of which table and rows to access.
When you have made all necessary choices, the wizard automatically generates new pages for your project. The visual pages contain the appropriate components to implement the kind of display you have chosen. The components are automatically connected correctly, and their properties are set as needed. In addition, there is a page named global.html that contains the nonvisual database connection and initialization objects.
You can easily create an application using the Database Application Wizard and examine the generated pages to help you understand how such an application works. You can modify the generated pages if you wish.
NOTE:
The Database Application Wizard uses DBSource objects as an additional layer
of indirection in connecting the cursor to the DBPool component; you do not
need to do this in your own applications. §
Database Presentation Types
The Database Application Wizard can automatically generate the following types of database presentation:
For all presentations, the wizard creates a database cursor, necessary database-access components (such as a LiveWire DBPool), and the display elements. It automatically connects the display elements to the cursor as needed and also creates server-side logic for interpreting values submitted in forms and updating the database when needed.
Search Pages
For read-only and interactive presentations, you can choose to create a search page that allows you to select particular records from a database. When you select this option, the Database Application Wizard creates an additional initial page for the application. This page contains a form with a text-entry element for each column in the database table. You can enter search values in any column; the application searches for all records matching the entered values, and displays them in the table. (For master-detail presentations, the search is in the master table.)
Master-Detail Applications
Master-detail pages consist of one table or form showing all the rows of a selected database table and set of columns (the master), and a second table or form showing the selected columns of a different database table (the detail). The second database table is related to the first through a key column. When the user selects the value in the key column of the master table, Visual JavaScript updates the contents of the detail table or form to show the selected details.
For example a master-detail application could have a master table that shows all of the departments of an organization. When the user selects a department number, the detail table could show all of the employees who work in that department.
You can choose how the master and detail tables are displayed. They can appear on the same page with one replacing the other, on the same page in different frames, or in different windows.
For this type of application you must specify the master table and columns, and the detail table and columns. In addition, you must specify the key column for the master table, and the corresponding foreign key column for the detail table. The Database Application Wizard uses the key information to construct a WHERE clause for the query that selects the detail information.
Using Forms in Database Applications
The HTML Form component, together with the various HTML INPUT form elements, offer a basic and flexible way to display data retrieved from a database. You can also design forms that allow users to enter new data or update the database.
Creating Forms to Display Data
To create a data-display form, you create a form and a cursor, then add an appropriate display element to the form for each item of data that you expect. You then use the Connection Builder to connect each form element to the cursor, so that it displays the correct data whenever the value changes.
You can connect elements of an HTML Form to any of the client-side cursors: the JavaScript Client Cursor or Java Client Cursor, or either of the dummy cursors. First, connect the cursor to a DBPool and specify a select statement in its SQL Query property. Then, make a property connection, using the Connection Builder, between one of the cursor's propertyChange events and each form element.
The connected form elements are automatically populated with the current database values. With the property connection, the values are automatically updated whenever the data changes--that is, whenever a propertyChange event occurs in the cursor.
When you build a form this way, you must add buttons and connect them to the cursor's methods to make it possible for the user to take actions such as getting the next or previous row. To do this, use the Connection Builder to make an event connection between the button's click event and the appropriate method in the cursor.
Creating Forms Automatically
The Database Application Wizard creates data-display forms automatically as part of the entire database application that it generates. However, if you want to do more of the application design yourself, you can still take advantage of one of the Wizard's features to create a form automatically that contains all of the appropriate display elements connected to a particular cursor.
A special command, Create Default Form, creates a form that contains display elements appropriate to the data as well as buttons for each of the user actions, and automatically makes all of the connections between the components.
Before you can create a default form, you must set up a page with one of the client cursors, connect the cursor to a DBPool in the DBPool property, and specify a valid select statement for the cursor in the SQL Query property.
When you have configured it, select the cursor component in the Page Editor and choose Create Default Form from the Tools menu. The form and its elements are automatically added to the page, connected to the cursor, and populated with data from the current result set.
When you create a default form, a labeled text element is created and named for each column specified in the cursor's query, preceded by an underscore. For example, if there is a column "cust," the text component where the user can see (and possibly enter) the value is named _cust. Each form element is connected with a property connection to the cursor property corresponding to its column.
If you have specified that the cursor is updatable (that is, that the value of the Updatable property is true), the form also contains hidden elements that retain the old values when the user changes a value. There is one hidden element for each text element, with the same name preceded by _old: for example, _old_cust.
The form also contains navigation buttons and an Execute button. If the cursor is updatable, the form contains buttons for Add Row, Delete Row, and Update Row. Each button is automatically connected with an event connection to the corresponding cursor method.
Updating Databases from Forms
The Database Form Handler is a special component designed to work with the forms that are created automatically by the Create Default Form command. By putting this server component on the form's action page, you can easily use the form values to perform particular database operations: Insert Row, Delete Row, and Update Row.
Follow these steps to use a Database Form Handler:
- Make a new page and connect the form to it. (See "Connecting a Form to a Page")
- Put a Database Form Handler component on the page and inspect it.
- Specify its
DBPool property using the DBPool Editor.
- Set the
Table Name property to the name of the database table you wish to update.
- Specify the
Operation property (INSERT, DELETE, or UPDATE).
- You can specify JavaScript code to be executed when the operation succeeds or fails--to notify the user of what happened, for example. Specify client-side JavaScript in
On Success - Client or On Failure - Client; specify server-side JavaScript in On Success - Server or On Failure - Server.
- Deploy the application to test it, since this server-side component must be compiled.
When you submit the form, the specified operation is automatically performed on the specified table, using the data entered into the form.
This component takes advantage of the fact that the form elements are named for the database columns. If you follow the same naming convention, you can use the Database Form Handler to add insert and delete actions to forms you create manually. To update, you must also add hidden elements to the form to retain the old values. You can examine an automatically created form to see how this is done.
Database Samples
Visual JavaScript comes with a sample project, db, that demonstrates a number of different types of database connection and data display using the built-in components.
Important
The db sample applications require that you have a database server installed
and have configured the client software correctly. The samples use the
LiveWire Video sample database tables, which must be installed on your test
database. See "Configuring Your Database" in Writing Server-Side JavaScript
Applications for information about setting up your database to run with the
LiveWire Database Service and installing the sample database tables. §
For additional information, see the tutorial example of a Visual JavaScript database access application in Netscape ONE Database Application Tutorial.
Opening the Database (db) Project
Open the db sample project and examine the examples.
- Choose Open from the Project menu.
- Double-click the db sample project.
The db project, which contains samples of different types of data connections, is displayed in the Project window.
- Double-click the
bufferedCursor.html sample page. Visual JavaScript displays the page in the Page Editor, as shown in Figure 6.4.
Figure 6.4 The bufferedCursor.html page from the db sample project
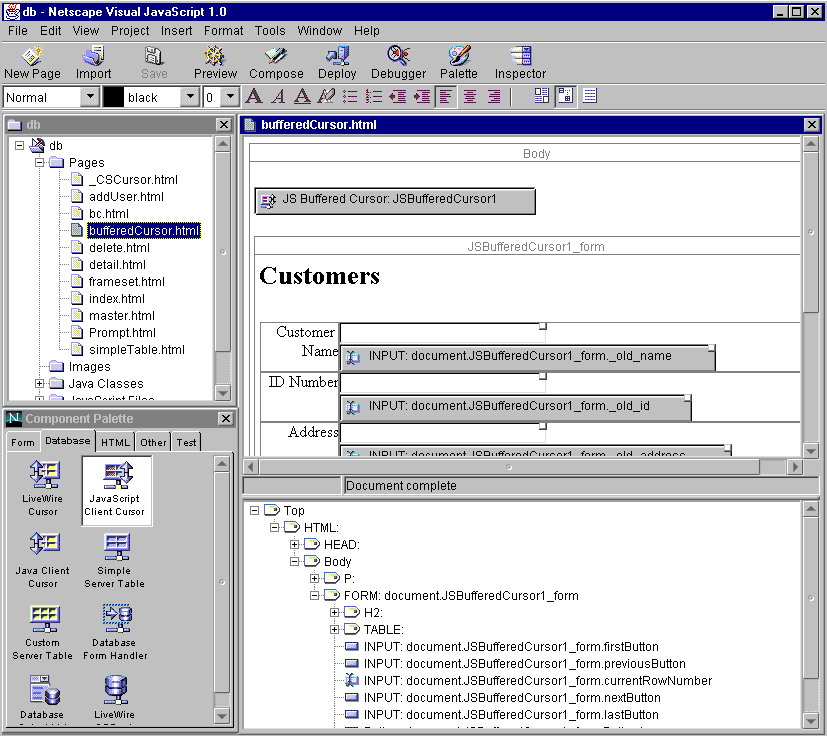
The first object on the page, the JavaScript Client Cursor, is a JavaScript component. This component is a cursor object that executes on the server and contains settings for a LiveWire cursor that retrieves data from the database, packages it up in another component, and then runs in a client component with the same name. The unique behavior of running both on the server and the client allows the form elements to address the client side of the cursor component directly.
NOTE:
For information about LiveWire database objects and the LiveWire runtime, see
the Enterprise 3.0 documentation on the DevEdge site. §
Configuring the Database Connection
You must configure the cursor to use a LiveWire DBPool component before you can connect to the database. You can use the DBPool Editor to do this.
- Display the
bufferedCursor.html page in the Page Editor and double-click the JavaScript Client Cursor component. The Inspector appears, displaying the properties of this component, which include DBPool.
- Click the ellipsis (...) by the
DBPool property to display the DBPool Editor.
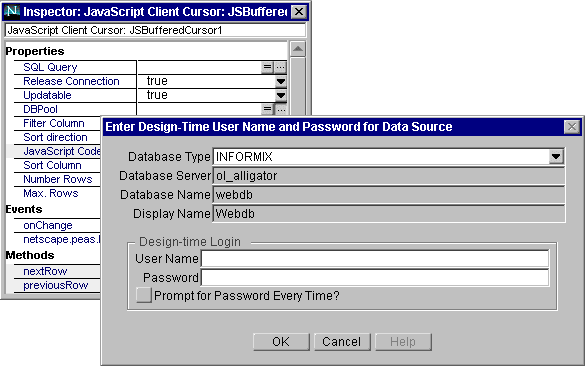
- If you have not yet identified any data sources, you can do so in the dialog box (Figure 6.5) that appears. For the sample, this should be the LiveWire video sample database.
Figure 6.5 Identifying a Data Source
- When you have created a data source (or if data sources are already known), the DBPool Editor appears, as shown in Figure 6.6.
Figure 6.6 The DBPool Editor
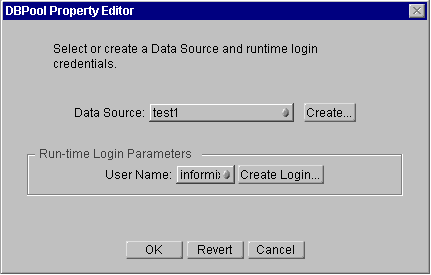
- Select the data source you wish to use.
- Enter the design-time password and user name for your server.
- Click OK. Notice that the
DBPool property of the cursor is set to a valid LiveWire DBPool component. If one does not already exist, the system creates one.
Connecting Components
The form should be populated with values from the current data set when the data changes. For an HTML form, this is accomplished through property connections between the form elements and the cursor.
Once you have specified the query, the cursor has a property named for each column in the table, and the property value changes when the data changes. Each field in the table that shows one of these values has a proper connection to one of these properties in the cursor.
You can use the Connection Builder to examine these connections as follows:
- Display the
bufferedCursor.html in the Page Editor and double-click the JavaScript Client Cursor component to display it in the Inspector.
- There are a number of existing connections. Select the
value_nameChange event and click the ellipsis (...) to bring up the Connection Builder for that connection.
The Connection Builder shows that the source component is JSBufferedCursor1 and the target component is document.JSBufferedCursor1_form._name. The connection is a property connection between the _name property of the cursor and the Value property of the text box.
- You can inspect the other column-value properties of the cursor to see that they are each connected to a form element for display.
Some database-access and display components also support a direct connection. A display component that supports a direct connection has internal logic that determines how to display the changed data whenever a connected cursor's rowChange or tableChange event occurs. When you create a direct connection between a cursor and a display component, the cursor is the connection source and the display component is the connection target.
See "Connecting Components" for more information.
Testing the Application
Because it has server-side logic, you must deploy the application to test it.
- Click Deploy on the toolbar.
The Deploy Project to Server dialog box appears as shown in Figure 6.7, allowing you to specify deployment information.
Figure 6.7 The Deploy Project to Server dialog box
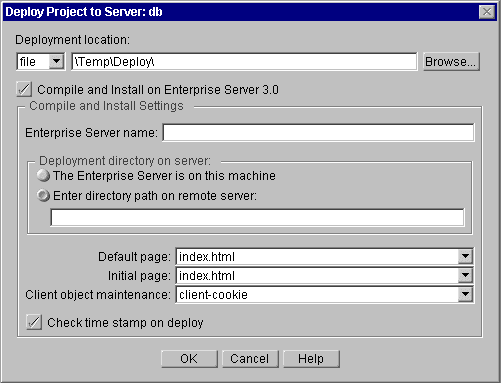
- Specify the deployment location. This is the path from your workstation to a directory where you can copy the files for compilation.
- Select Compile and Install on Enterprise Server 3.0. (If you are running Enterprise Server 2.x, you must manually compile the application. See "Compiling Applications Using Enterprise Server 2.x.")
- Since you are deploying locally for testing, select "The Enterprise Server is on this machine." (If you have not installed Enterprise Server on the local machine, see "Deploying and Compiling Applications.")
- Click OK to deploy the application and compile. A message box appears if the compilation produces errors.
- Choose Run from the Project menu to run the compiled application.
See "Deploying and Compiling Applications" for more information.
[Contents] [Previous] [Next] [Last]
Last Updated: 11/19/97 12:45:38
Copyright © 1997
Netscape Communications Corporation


