=) in the Inspector. When a property can have an expression as a value, the equal-sign button at the right of the value cell gives you access to the Expression Editor, which you can use to create JavaScript code for the value. See "Creating JavaScript Expressions."
SQL Query property whose value you must set to a valid SQL select statement. Use the SQL Builder to create SQL code for these properties. See "Creating SQL Queries."
Finally, if you want to specify behavior that does not fall into any other category, you can add JavaScript code directly to your application using special code components. See "Adding Code to an Application."
Connecting Components
When the end user takes an action, such as clicking a button or check box, entering text, or moving the cursor into or out of a text field, a program action called an event is generated. The behavior of your application depends on what actions are performed in response to these events. For example, when the user clicks a button labeled Next, the application might respond by getting and displaying the next record.
From the point of view of the programmer, an event handler function is called when a click event occurs, and responds by invoking another method that downloads new data and updates the table. From the point of view of the user, however, clicking the button updates the table. The button component and the table component are connected through the click event.
The key elements of any interaction are the source event and the action. The source event is the originator of the action; it determines when to execute the code. You can add conditions to an interaction just as you would add an if statement in code. The action specifies what to do when the condition is satisfied.
One of the most powerful features in Visual JavaScript is the ability to specify interactions at a high level, between components. Using the Connection Builder you can easily and quickly create connections, or interactions, between components, thereby specifying the behavior of your application without actually writing any code at all. Visual JavaScript automatically generates client-side JavaScript code for the specified relationship
NOTE: The Connection Builder makes only client-side connections. Because the connections are implemented in client-side JavaScript, the end-user of an application that contains connections must use a JavaScript-enabled browser.You can specify connections between server-side components by setting property values that are component references or JavaScript expressions. See "Creating JavaScript Expressions."
Connection Types
Depending on the kinds of components you are connecting, there are three types of connections you can make: property connections, direct connections, and event connections.
property <name> change event. Property connections are often made to the Value property of a component.
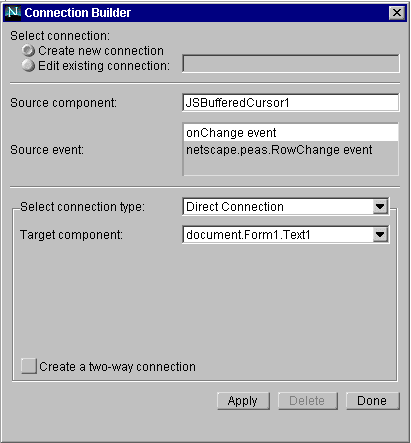
For a direct connection, you need only specify the trigger event and the target component. The target component is automatically updated appropriately when the trigger event occurs. This type of connection is used to connect Java and JavaScript components, such as some of the built-in data-display and database cursor components.
To support a direct connection, the source and target components must share an event/listener interface. Among the default components provided with Visual JavaScript, the Java Client Cursor and JS Client Cursor have tableChange and/or rowChange events, which you can connect directly to client-side Java tables and forms. When these events occur, the connected tables and forms are automatically populated with the current data in the cursor.
An event connection listens for a specified event in the source component. In response to the event, it can perform one or more actions specified in a handler script. You can use the Script Builder to generate an event handler that calls methods in a target component, or sets specified properties, or both. Alternatively, or in addition, you can specify arbitrary JavaScript code to be executed in response to the event.
Figure 5.1 The Connection Builder

propertyChange, tableChange, or rowChange event, you can specify a direct or event connection. If the source is a property name change event, you can specify a property or event connection.
Figure 5.2 The Connection Builder building a direct connection

Figure 5.3 The Connection Builder building a property connection
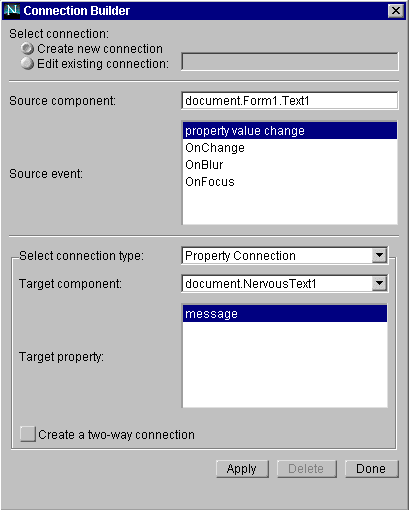
Value property, which is selected by default if present.
For direct and property connection types, a check box (initially, unchecked) lets you specify whether the connection should be two-way. In a two-way connection, each component acts as both source and target, just as if you had specified a second connection with the source and target reversed.
Figure 5.4 The Connection Builder building an event connection
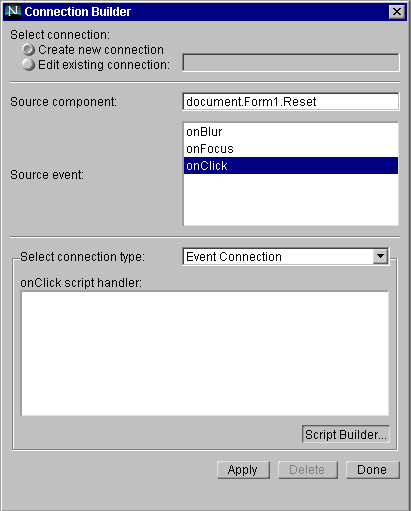
Follow these step to use the Script Builder:
NOTE: The source component in the Connection Builder is always the currently selected component. If you select another component in the Page Editor while you are in the process of modifying a connection, a dialog box warns you that the currently displayed connection information will be discarded if you change the source component. If you choose to continue (that is, change the source component), the connection you were modifying reverts to its most recently applied state. §
=) button on the right side. A value that is currently specified by an expression also has an equal-sign at the left side of the value cell. You can enter a JavaScript expression directly into the value cell in the Inspector by prefacing the value with an equal-sign and enclosing any string values in quotes, as in this example:
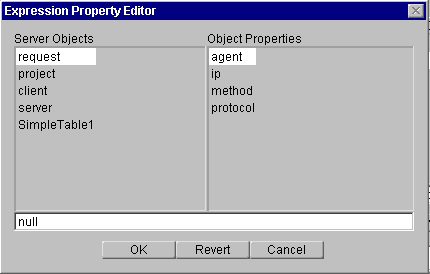
= "User entered: " + Text1.ValueAlternatively, you can use a custom property editor called the Expression Editor (Figure 5.6) to help you build and enter a JavaScript expression. Click the equal-sign button at the right of the property's value cell to bring up the Expression Editor.
Figure 5.6 The Expression Editor
Tip
The values submitted by a form are passed as parameters to the associated
page via the request object. When you have interactively connected an HTML
form to the current page (as described in "Connecting a Form to a Page" on
page 94), you can see and access these runtime values in the Expression Editor
when you are setting the value of a server component property. §
SQL Query property of database-access components must contain a valid SQL select statement in order for the component to access data from the database. You can use a custom property editor called the SQL Query Builder to help you build and enter a valid SQL statement.
Important If you are using Enterprise Server 2.x, you must use Application Manager to install the following file to your web server before attempting to use the SQL Query Builder:A number of components have ainstall dir/serverJS/metadata2.web. See the Release Notes for instructions on installing this application. §
SQL Query property, in which you specify a select statement with which to download data for display. This property is in the following components:
Figure 5.7 shows the SQL Query property of a JavaScript Client Cursor component.
Figure 5.7 Inspecting a
SQL Query property in the JavaScript Client Cursor component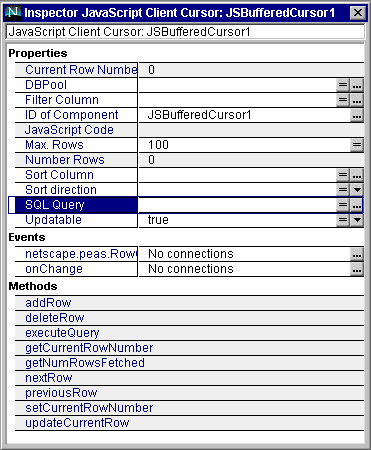
SQL Query property's value cell to bring up the SQL Query Builder custom property editor (Figure 5.8). If you have not yet connected to a data source, you are prompted for your design-time user name and password before the SQL Query Builder appears.
Figure 5.8 The SQL Query Builder custom property editor
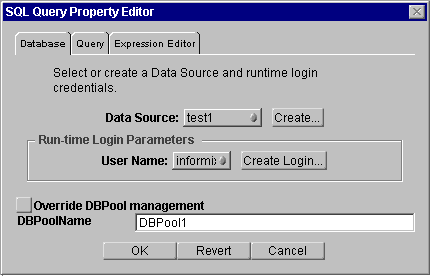
DBPool property of the component you are editing is set. If a DBPool component for the data source is found on the globals.html page, it is used. Otherwise, a new DBPool component is created on the globals.html page. For compatibility with earlier releases, you also have the option of using the DBPool already specified in the DBPool property. §
NOTE: The SQL expression is stored in theSQL Queryproperty as a string value. If you want to include any quoted strings in the expression, you must use the backslash (\) escape character before internal quote marks, as in this example:
"SELECT ITEM_NUM \"Product ID\", DESCRIPTION \"Product Description\" FROM ITEM_MASTER"
var myVar = request.myVal;When the target document is a Visual JavaScript page that contains a cursor and an associated SQL statement, you can modify that statement to include values passed to the page from a calling form as follows:
"SELECT myFirstColumn, mySecondColumn FROM myTableWHERE myFirstColumn =
'" + request.myVal + "' "
When you call the submit method of an HTML Form component, the values of all the elements on the form are collected and sent as parameters to the URL that is the value of the Form's Action property. The Form's Method property determines if the parameters are sent in the same transmission (GET) or in a separate transmission (PUT).
You can place a Submit Button component on the form to make it easy for users to apply values they have specified. The Submit Button component is a specialized HTML button that, when clicked, calls the containing form's submit method. The label of the button is, by default, Submit. You can change the label by inspecting the component and setting the Button Label property.
You can connect an HTML Form component to another page so that when the form is submitted, the connected page is loaded and the values of the form's elements are passed as parameters to that page. The connected page can contain server-side processing components, such as the Database Form Handler, that use the parameters submitted with the form.
See "Creating Forms to Display Data" for more information on passing values to a database using the Database Form Handler component.
Connecting a Form to a Page
You can connect a form to a page by using the Inspector to set the value of the Action property directly to the URL of the target page. You can specify an absolute URL (an entire path starting with http://) or a relative URL (a page file name that can be found in the project directory).
You can also connect a Form component to another page in the same project interactively, using drag and drop. Follow these steps to do so:
Action property of the Form component is set to the URL of the target page. The target page should contain a server component, such as Database Form Handler, that uses the form values. When the user submits the form, the target page is loaded, and the values in the form are passed through the request server object.
At runtime, the request object has a property for each value, named for the form element whose value is being passed, preceded by an underscore--for example, _Text1.
NOTE: If you have connected the form to the page interactively (by dragging and dropping the plug icon) you can use the Expression Editor to access the runtime properties of therequestobject that contain the form values. If you have connected the form to the page by setting theActionproperty directly, however, these value-access properties do not appear on therequestobject until run time. To access them from the action page, you must type in the generated property names. §
request server object. A page receiving the request can use these values by accessing properties of the request object that are named for the form elements.
When you have connected the form to a target page by dragging the connection plug from the form to the page, you can see the value-passing properties of the request object in the Expression Editor. (Note that this is not the case when you specify the URL of the target page directly in the Action property of the form.) When you edit a JavaScript-valued property of a component on the target page, the Expression Editor allows you to retrieve the form values from the request object.
Follow these steps to retrieve form values:
=) to bring up the Expression Editor.
Action property directly, type the property accessor directly into the Expression text box--for example, request._Text1.
Adding Code to an Application
There are several places where you can enter JavaScript code into your application:
JavaScript Code property, which contains the code that runs when the page is loaded. To set the value, click the ellipsis (...) next to the JavaScript Code property in the Inspector. A multi-line text editor appears, in which you can enter or edit JavaScript code.
For the Client Script component you can specify, in the Source File property, a file containing JavaScript code. This code is run when the page is loaded. If you specify a source file, the JavaScript Code property is not considered.
You can use script components to modularize your application logic as it becomes more complex. They can, for example, contain initialization or helper functions that you can call in the code fragments that you specify with the Script Builder and Expression Builder, making these code fragments more manageable.
Last Updated: 11/06/97 13:24:52