You can test client-side behavior by previewing pages, but to test server-side behavior you must deploy the application, at least locally. The JavaScript Debugger is integrated with Visual JavaScript. (See "Testing and Debugging Applications.")
Deploying and Compiling Applications
When you have completed your application, you must deploy it to the server. When you deploy, the files in your project are copied to the server, and the Application Manager installs the files in the location you specify and registers the application. If your application includes any server-side JavaScript, that code must be compiled on the Enterprise Server. When the application is successfully deployed, your Enterprise Server can access it and serve your pages on demand.
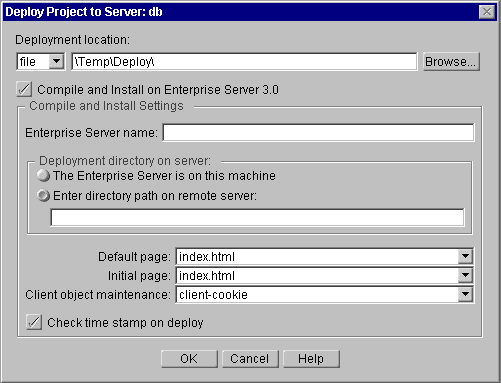
Default deployment information for a project is specified in the project's properties. Display the project in the Inspector to examine or change the properties, which correspond to the values you specify in the Deploy to Server dialog box, shown in Figure 7.1. The values you set in the project properties appear as default values in the dialog box.
NOTE: Two project properties,You can set default deployment preferences to be applied to new projects. (See "Deployment Preferences" for more information.) Values that you set in the project's properties override the preferences.External LibrariesandMax DB Connections, affect few applications and do not appear in the Deploy to Server dialog box. If you need to use these features, set the property values before deploying the application. Refer to the LiveWire documentation for information on these features. §
When you are ready to deploy and compile, click Deploy on the toolbar or choose Deploy Application to Server from the Project menu. The Deploy Project to Server dialog box appears as shown in Figure 7.1, allowing you to specify deployment information.
Figure 7.1 The Deploy Project to Server dialog box

Important You must have write access to the location where the files are to be copied. §
Important The remote compilation feature is available only if you are using Enterprise Server 3.0 and have previously installed theEnterprise server name. This is the hostname of the deployment machine running Enterprise Server 3.x. Deployment directory on server. This is the path to the deployment location from the server machine.jsacRemoteapplication to your server. See the Release Notes for instructions on installing this application. If you are using Enterprise Server 3.5 or later, thejsacRemoteapplication may be installed automatically; check the release documentation for the server. If you are using Enterprise Server 2.x, you must manually compile your applications. §
index.html for a standard URL.
Initial page. The JavaScript runtime engine executes this page when you start the application. This page is executed exactly once per running of the application. It is generally used to initialize values, create locks, and establish database connections. This information is optional.
Client object maintenance. This is the technique for maintaining the client object. This can be client cookie, client URL, server IP, server cookie, or server URL. See "Techniques for Maintaining the Client Object" in Writing Server-Side JavaScript Applications
Check time-stamp on deployment. If you select this option, the system checks the time stamps of existing files at the destination before copying them. If an existing file is newer, it is not overwritten. If you do not select this option, all files are copied and replace any existing versions.
When you have finished specifying values, click OK to deploy the application. A message box appears if the compilation produces errors. When deployment is successful, a dialog box appears in which you can specify whether to run the application immediately, and whether to use debugging options when the application is run. See Getting Started with Netscape JavaScript Debuggerfor information on how to use the Debugger.
To run the deployed application, choose Run from the Project menu, or click Run from Application Manager on the deployment server.
build.bat, is deployed along with the project files for use with Netscape Enterprise Server 2.x.
.web file appears in the deployment directory.
http://server.domain/appmgr
http://server.domain/appname
NOTE: See Writing Server-Side JavaScript Applications for information about using Application Manager. §
When you preview a page, any server-side code has not yet been compiled, and appears as JavaScript code on the previewed page. To inspect the runtime appearance and test the behavior of a page that contains server-side code, you must deploy it. You can deploy it to your local server for testing, even if you intend to deploy it to a remote server for delivery. Visual JavaScript includes the Netscape JavaScript Debugger. The debugger feature allows you to debug client-side JavaScript code. In addition, a server-side JavaScript debugger is available with Enterprise Server 3.5. For more information, see the JavaScript Debugger documentation. To start the debugger with the current page loaded, click Debugger on the toolbar or choose Debug from the Project menu. See Getting Started with Netscape JavaScript Debugger for information on how to use the tool.
Last Updated: 11/06/97 13:24:54