[Contents] [Previous] [Next] [Last]
This chapter describes how to customize Visual JavaScript by configuring or extending the Component Palette, creating page templates, setting environmental preferences, and using Composer plug-ins.
You can change the appearance and composition of the Component Palette, so that it fits your needs for the kinds of projects you are creating. You can, for example, change the arrangement of tabs and components. You can also extend the Palette, adding components that you develop yourself, or that you import from other developers or other projects. (See "Customizing the Component Palette.")
You can create page templates, in order to create a "look and feel" for your projects. (See "Creating Page Templates.")
You can set environmental preferences to specify which editors to use for different kinds of files, the location of the Palette archive, your deployment options (such as the default deployment server), and which properties are shown in the Inspector. (See "Setting Environmental Preferences.")
Visual JavaScript is integrated with Composer plug-ins, and any plug-ins you have loaded are automatically available through the Tools menu. (See "Using Composer Plug-ins.")
Customizing the Component Palette
You can modify the default Palette organization to fit your own application
development needs. Changes to the Palette are automatically saved, and the
Palette state is retained between Visual JavaScript sessions.
You can specialize the Component Palette in the following ways:
Rearranging the Palette Tabs
You can customize the appearance of the Component Palette. You can change the order of the tabs, or move components to different positions on a tab, or to a different tab.
Changing the Order of Tabs
You can modify the order of the Palette pages by clicking a tab and dragging it to the location you prefer. Drop a tab on the right side of another tab to insert it to the right of that tab, and drop it on the left side to insert it to the left.
Moving and Copying Components
To move a component to a different location on the same tab, drag it to the left or right of another component on the tab. To move a component to a different Palette tab, press Shift while dragging it to the target tab.
To make a copy of a component, right-click the component and choose Copy from the context menu. To paste the copy to the same tab or another tab, right-click the background of the target tab and choose Paste from the context menu. The copy is inserted at the end of the tab. To paste the copy into a particular location on the tab near another component, right-click on the left or right half of that component and choose Paste from the context menu. The copy is pasted to the left or right of that component, depending on where you clicked.
Adding New Tabs to the Palette
You can add new, blank tabs to the Palette to hold a set of components, or you can load existing tab files from the archive, complete with their components. Your Component Palette does not need to display all of the tabs that exist in the Palette archive. You can unload tabs to remove them from a Palette, and reload tabs that have been unloaded.
Changes to the Palette are automatically saved, and the Palette state is retained between Visual JavaScript sessions.
Locating Palette Tab Files
Palette tab files are stored in the Palette archive, and have the same names as the tabs in the Palette window, with the extension .pa2. The Palette archive can be located anywhere, but this is the default location:
<install dir>/palettes/defaultuser
To change the location of the Palette archive directory, choose Preferences from the Edit menu, click the Palette tab, and enter the Palette directory location. If you are using Visual JavaScript in a team development environment, you can have a separate directory for each user's Palette.
Adding Blank Tabs
To add a new, empty Palette tab to the default Palette, choose New Tab from the Edit Component Palette submenu of the Edit menu, or right-click the background of the Palette and choose New Tab from the context menu that appears. The new tab appears in the Palette and is ready for you to add components to it.
The default name for the first new Palette tab is "Unnamed1". To change the tab name, double-click the tab, edit the name, and press Enter. Press Esc to cancel the edit action.
Removing Tabs
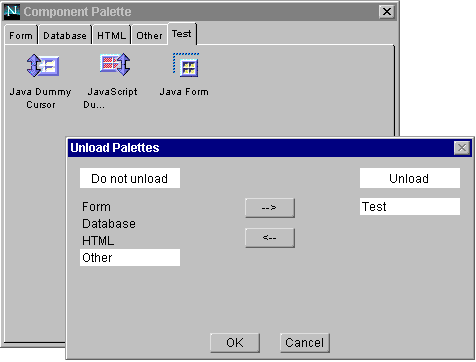
To remove tabs from the Palette, choose Load/Unload from the Component Palette submenu in the Edit menu, or choose Unload from the right-click context menu in the Palette. In the resulting dialog box (Figure 8.1), specify one or more tabs to remove from the Palette.
Figure 8.1 Removing the "Test" tab from the Palette

- Select the Palette page you want to unload from the "Do not unload" list.
- Click the right-arrow to move the selected tab to the "Unload" list. You can also double-click a tab in the list to move it to the other list.
- Click OK. The specified tab is removed from the Palette window.
NOTE:
Unloading a Palette tab does not delete its files form your Palette archive, it just
removes the tab form the displayed Palette. §
Loading Tabs
To load tabs that have previously been unloaded, choose Load/Unload from the Component Palette submenu in the Edit menu, or choose Load>Selected from the right-click context menu in the Palette. The Load Palettes dialog box that appears is similar to the Unload Palettes dialog box shown in Figure 8.1. The tabs in the left-hand list ("Do not load") are those that are currently not loaded.
- Select the Palette tab you want to load from the "Do not load" list.
- Click the right-arrow to move the selected tab to the "Load" list.
- Click OK. The specified tab is added to the Palette.
To add all previously created Palette tabs to the Palette display at once, choose Load>All from the right-click context menu in the Palette.
NOTE:
When all tabs in the archive are already loaded, the Load menu items are
disabled. §
Installing New Components on the Palette
You can install a component onto your Palette and into your Palette archive directly from its source files. You can also import a packaged set of tabs and components that has been exported by a component developer.
You can copy customized components from the Page Editor to the Palette, from which you can easily instantiate the customized version to other pages. This is one way of creating a style for your application.
Installing and Importing New Components
You can add new components to the Palette and the Palette archive by installing a source file. To install a source file, do any of the following:
Use the dialog box to enter or browse for the location of the source file. (For a CORBA object, browse the file system for a source IDL file.)
When you install a source file, the proper Palette files are created and added to the Palette archive. In addition, any components that are defined in the source file are added to the current tab in the Component Palette.
To import a previously exported tab file, choose Import from the Component Palette submenu of the Edit menu, or right-click the background of the Palette and choose Import from the context menu. A file browser appears allowing you to select the .par file to be imported. In the file browser, specify the package file you want to import and click Open. The Palette files are created and installed in your Palette archive, and the tabs that are defined in the file (with their components) are added to your Palette.
NOTE:
For information about creating your own components, see the Netscape
Component Developer's Guide. §
Copying Components to the Palette
If an imported page contains a type of component that is not on your Palette, you can add it by dragging it from the Page Editor to the Component Palette.
When you have customized a component in the Page Editor and Inspector, you can drag it from the Page Editor back to the Palette to add a copy of it to the Palette. The resulting object is a version of the original component that contains your customizations.
Select the component and switch to the Structure or Source view to see the corresponding HTML code. This code is re-created when you place the customized component on a new page.
You can also select any block of HTML in the Structure view and drag it to the Palette, from which you can easily copy it to a new page. The block of HTML is treated as a component. Among the built-in components, the HTML Table is an example of this kind of "Palette component."
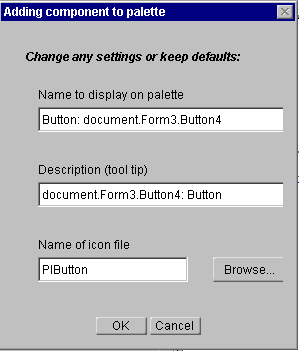
When you drag a component from the Page Editor to the Component Palette, Visual JavaScript displays the Adding Component to Palette dialog box, shown in Figure 8.2. Use this dialog box to specify how the component should be displayed in the Palette. Specify the name to be displayed for the new component, the description that appears when you move the cursor over the component (called the tool tip), and an icon to represent the new component.
Figure 8.2 The Adding Component to Palette dialog box

Exporting Palette Tabs
When you have developed a set of components in Visual JavaScript, you can export them. In essence, you package a set of tabs (with their components) in a single transportable file that can be easily loaded and installed--imported--at another site.
To export one or more tabs, choose Export from the Edit Component Palette submenu of the Edit menu. To export a single tab, right-click on the background of that tab and choose Export from the context menu. A file browser appears allowing you to specify a name and location for the transportable package file, which has a .par extension.
NOTE:
For information about creating your own components, see the Netscape
Component Developer's Guide. §
Creating Page Templates
Page templates allow you to define a style or look-and-feel for any number of projects or applications. Create a page with the desired default contents and save it as a template. Templates appear in the Create a New Page dialog box. When you choose one, a new page is automatically created with the same contents as the template page.
Follow these steps to create a page template:
- Create a page with the desired contents. You can, for example, choose colors, font styles, and images.
- Choose Save Page As from the File menu.
- Save the page in the
<install dir>/Templates directory, as <pagename>.html.
- Optionally, create a
<pagename>.txt file in the same directory. The first line of this file is used as an extended display name for the page file in the Project Window. The second line, if any, is used as a tool tip that appears when the user moves the cursor over the page file in the Project Window.
- Optionally, create
<pagename>.gif file in the <install dir>/Images directory, to be used as the icon for the page template in the Create a New Page dialog box. The icon image must be 16x16 pixels. You can, for example, edit a copy of the Blank Page icon (<install dir>/Images/BlankPage.gif) and save it as <pagename>.gif.
Setting Environmental Preferences
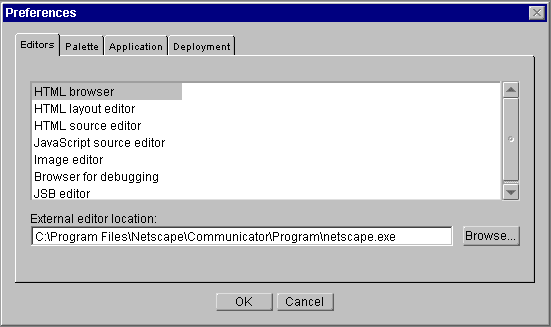
To set default values and preferences for your development environment, choose Preferences from the Edit menu. The Preferences dialog box appears, as shown in Figure 8.3. This dialog box has tabs for setting different kinds of preferences.
Figure 8.3 The Preferences dialog box

Editor Preferences
When you have selected the Editors tab of the Preferences dialog box, you can select which editors to use for editing various kinds of files. Enter a path to the executable file for the editor of your choice, or click Browse to locate the executable file in the file system. The editor that you choose appears when you edit a file of the corresponding type from the Project window. (See "Editing Project Files" for more information.)
HTML browser. A browser for previewing and running your application, such as Netscape Navigator, which is the default value.
HTML layout editor. A visual editor for HTML files, such as Composer, which is the default value.
HTML source editor. A text editor for HTML files, such as emacs or Wordpad.
JavaScript source editor. An editor for JavaScript source files listed under the JavaScript Files in the Project window.
Image editor. An editor for image files listed under the Images folder in the Project window.
Browser for debugging. A browser for debugging your application. (Since you can only use the JavaScript debugger with Communicator 4.0, you might need to distinguish this from the runtime browser.)
JSB editor. An editor for .jsb files listed under the Data Files folder in the Project window.
Palette and Application Preferences
When you have selected the Palette tab of the Preferences dialog box, you can enter a path name for the directory where you want your Palette archive to be located. Click Browse to locate a directory in the file system. See "Locating Palette Tab Files" for more information on Palette archives.
When you have selected the Application tab of the Preferences dialog box, you can set the following preferences:
Deployment Preferences
When you have selected the Deployment tab of the Preferences dialog box you can set the deployment property values of new projects that you create. If you change a preference to a value different from the corresponding value in the current project, Visual JavaScript displays a dialog box. Here, you can choose to reset the project values to match the preferences or retain the existing values for the current project. See "Inspecting Other Objects" for more information.
When you deploy a project, the deployment values of the project are used as default values in the Deploy to Server dialog box. The project values override the preferences. See "Deploying and Compiling Applications" for more information.
You can set these deployment preferences:
Compile and install project on Enterprise Server 3.0. Select this if you are using Enterprise Server 3.0, or later versions, and wish to take advantage of the remote compilation feature.
Enterprise server name. Enter the name of the deployment server machine.
Default deployment directory. Choose whether to use HTTP or file copy to transfer files to the deployment machine.
Using Composer Plug-ins
Visual JavaScript is generally compatible with Composer plug-ins. These are Java components that perform specific editing tasks on some or all of the HTML code for a page. If you have installed any Composer plug-ins, they automatically appear as menu items under the Tools menu. They are integrated with the Page Editor in the same way as with Composer.
NOTE:
There are some limitations on the extent to which Visual JavaScript supports
Composer plug-ins. Refer to the Netscape Component Developer's Guidefor
details. §
Composer plug-ins can be found or installed in the plugins directory, which is part of the standard Communicator installation:
Communicator install dir/program/plugins
[Contents] [Previous] [Next] [Last]
Last Updated: 11/06/97 13:24:55
Copyright © 1997
Netscape Communications Corporation


