Complete Contents
About This Guide
PART 1: Netscape Certificate Management System
Chapter 1: Introduction to Certificate Management System
Chapter 2: Administration Tasks and Tool
Chapter 3: Configuration
PART 2: Managing Certificate Management System
Chapter 4: Installing and Uninstalling Instances
Chapter 5: Starting and Stopping Instances
PART 3: System-Level Configuration
Chapter 6: Configuring Ports, Database, and SMTP Settings
Chapter 7: Managing Privileged Users and Groups
Chapter 8: Keys and Certificates
PART 4: Authentication
Chapter 9: Introduction to Authentication
Chapter 10: Using the PIN Generator Tool
Chapter 11: Configuring Authentication for End Entities
Chapter 12: Developing Authentication Plug-ins
PART 5: Job Scheduling and Notification
Chapter 13: Introduction to Job Scheduling and Notifications
Chapter 14: Configuring Jobs
PART 6: Policies
Chapter 15: Introduction to Policies
Chapter 16: Configuring Policies
PART 7: LDAP Publishing
Chapter 17: Introduction to LDAP Publishing
Chapter 18: Configuring Subsystems for LDAP Publishing
Chapter 19: Publishing CRLs
PART 8: Agent and End-Entity Interfaces
Chapter 20: Introduction to End-Entity and Agent Interfaces
Chapter 21: Customizing End-Entity and Agent Interfaces
PART 9: Logs
Chapter 22: Introduction to Logs
Chapter 23: Managing Logs
PART 10: Issuance and Management of End-Entity Certificates
Chapter 24: Issuing and Managing End-Entity Certificates
Chapter 25: Recovering Encrypted Data
PART 11: Appendixes
Appendix A: Distinguished Names
Appendix B: Backing Up and Restoring Data
Appendix C: Command-Line Utilities
Appendix D: Certificate Database Tool
Appendix E: Key Database Tool
Appendix F: Netscape Signing Tool
Appendix G: SSL Strength Tool
Appendix H: SSL Debugging Tool
Previous Next Contents Index Bookshelf


Chapter 16 Configuring Policies

Netscape Certificate Management System (CMS) provides a customizable policy framework for its main subsystems, the Certificate Manager, Registration Manager, and Data Recovery Manager. This chapter explains how to configure these subsystems to apply organizational and other policies on incoming certificate and key-related requests. The chapter also shows how policy plug-in implementations and rules (configured instances) appear in the configuration file.

Before reading this chapter, you should have read the chapter "Introduction to Policy". In particular, you should be familiar with the various policy plug-in modules that come with Certificate Management System. If you are not, see "Built-in Policy Plug-in Modules".

This chapter has the following sections:


Policy Management
You can manage both constraints and extensions policy rules in two ways:

The recommended method is to use the CMS window.

Policy Management from the CMS Window

The CMS window (as shown in Figure 16.1) provides the appropriate user interface to support policy management for each subsystem, the Certificate Manager, Registration Manager, and Data Recovery Manager.

Figure 16.1 Policy information in the CMS window

Under each subsystem tree node in the CMS window, you will find a Policies object. This object represents the policy processor specific to that subsystem. The processor represents the policy plug-in implementations and instances for the subsystem.

From this window you can accomplish the following operations:

The sections that follow describe the parts of the window from which you carry out these operations.

Policy Rules Management Tab

The Policy Rules Management tab displays the current policy configuration for the selected subsystem. The tab lists the currently configured policy instances (or rules) for a subsystem, enabling you to manage them at a single place. From this tab you can add, modify, or delete rules, enable or disable individual rules, and change the order in which the rules get applied to an end-entity request.

Add. The add operation shows a list of registered policy plug-in modules from which you can select the one you want to configure. You configure an instance of the selected module with the help of the policy rule editor (see "Policy Rule Editor"). When you save the changes, the subsystem creates the rule and displays it in the list of policy rules. For instructions on adding new policy rules, see "Adding a Policy Rule".

Delete. The delete operation allows you to remove unwanted policy rules from the CMS configuration. For instructions on deleting policy rules, see "Deleting a Policy Rule".

Edit/View. The edit operation allows you to view and modify configuration parameter values associated with currently configured policy rules. You modify the parameter values with the help of the policy rule editor (see "Policy Rule Editor"). For instructions on modifying policy rules, see "Modifying a Policy Rule".

Reorder. The reorder operation allows you to change the order of the policy rules a subsystem applies to an end-entity request. Enabled rules are applied in the order in which they appear; disabled rules are ignored. For instructions on reordering policy rules, see "Reordering Policy Rules".

Policy Rule Editor

The policy rule editor is designed to be generic. Its simple graphical interface enables you to create new policy rules and modify the configuration of an individual rule. When you are adding a new rule, the editor shows the configuration parameters pertaining to the plug-in module you selected. When you are modifying a rule, the editor shows the configuration parameters pertaining to the rule you selected.

All configurable parameters are displayed in the form of a table with two columns and multiple rows, each parameter occupying a row in the table. The left column lists the names of the configurable parameters; the right column is designated for entering the appropriate values. The ordering of the configurable parameters is irrelevant unless it is defined by the policy plug-in implementation.

You can also use the policy rule editor to change the status of a rule from enabled to disabled, or vice versa.

The policy rule editor provides normal save, cancel, and help functionality. You can specify names for policy rules, but only at the time of creating new ones; you cannot change the names later.

Policy Plugin Registration Tab

The Policy Plugin Registration tab lists the currently registered policy plug-in implementations for the selected subsystem and gives you access to the window from which you can register new plug-in modules. On this tab you will find the names of registered plug-in modules listed on the left and the path to the Java class that implements the plug-in module listed on the right.

You can perform the following operations from this tab:

Register. This operation allows you to register a new policy plug-in module. You do this with the help of the policy registration editor (see "Policy Plug-in Registration Editor").

When you save the changes, Certificate Management System loads the policy plug-in module and displays it in the list of currently registered plug- ins. For instructions on registering new authentication plug-in modules, see "Registering a Policy Plug-in Module".

Delete. This operation allows you to remove unwanted policy plug-in modules from the CMS framework. For instructions on deleting policy plug-in modules, see "Deleting a Policy Plug-in Module".

Policy Plug-in Registration Editor

The policy plug-in registration editor allows you to register new plug-in implementations in a subsystem's policy framework. Registering a new policy plug-in implementation involves specifying the name of the plug-in module and the full name of the Java class that implements the policy interface (implementation must be on the class path).

For example, you can add a policy implementation, named as follows, to the Data Recovery Manager's policy framework:

com.netscape.policy.KeyArchivalPolicy

Policy Parameters in the Configuration File

The sample shown in Figure 16.2 illustrates how policy-specific information appears in the configuration file. Keep the following points in mind:

To change the configuration by editing the configuration file, follow the instructions in "Changing the Configuration by Editing the Configuration File".

Policy Plug-in Implementation and Rule

Policies are implemented as Java classes, which are then registered with the appropriate subsystem as plug-ins. You can use a given implementation of a policy plug-in module and configure multiple rules (instances) of it. Each rule must have a unique name (an alphanumeric string with no spaces) and can contain different input parameter values to apply to different requests. In other words, a given policy implementation can be shared by multiple configurations. You can also distinguish the applicability of configured instances by including appropriate names.

For example, with the help of predicates you can configure the ValidityConstraints plug-in module differently for users in two different organizational units (OUs). The figures that follow illustrate this. The same plug-in module, ValidityConstraints, has been used to configure two rules, cert_validity_for_sales and cert_validity_for_mktg, for employees in two organizational units (sales and marketing) by adding the predicates ou==Sales and ou==Marketing.

Figure 16.3 shows the two policy rules, both based on the same plug-in module, in the CMS window.

Figure 16.3 Separate certificate validity periods for users in two organizational units

Figure 16.4 shows the two policy rules, both based on the same plug-in module, in the configuration file.

Figure 16.4 Separate certificate validity periods for users in two organizational units


Managing Policy Rules
This section explains how to use the CMS window to perform the following operations:

For information on adding or changing policy-specific information in the configuration file, see "Policy Parameters in the Configuration File".

Adding a Policy Rule

Adding a policy rule to the CMS configuration involves creating a new instance of an already registered policy plug-in module, assigning a unique name (an alphanumeric string with no spaces) for the instance, and entering appropriate values for the parameters that define the plug-in implementation you want to create an instance of.

When you add a policy rule, the CMS configuration gets updated with policy-specific information. Keep the following points in mind:

Note During installation, the Certificate Manager and Registration Manager automatically create policy rules that you would most likely want to use. For details, see "Modifying a Policy Rule".

To add a new policy rule to the CMS configuration:

  1. Access the CMS window (see "Accessing the CMS Window").
  2. Click the Configuration tab.
  3. In the navigation tree, choose the subsystem to which you want to add the new policy rule.
  4. Click Policies.
  5. The Policy Rules Management tab appears. It lists any currently configured policy rules. For information about this tab, see "Policy Rules Management Tab".

  6. Click Add.
  7. The Select Policy Plugin Implementation window appears. It lists the currently registered policy plug-in modules.

  8. Select a plug-in module.
  9. The choices listed below are the ones provided out of the box with Certificate Management System. If you have registered any custom policy plug-ins, they too will be available for selection.

    For the purposes of this instruction, assume that you selected the ValidityConstraints module.

  10. Click Next.
  11. The Configure Policy Parameters window appears. It lists the configuration information required for this policy rule. For more information on how this window functions, see "Policy Rule Editor".

  12. In the Policy Rule ID field, type a unique name for this rule; be sure to use a name that will help you identify the rule.
  13. For the name, be sure to use an alphanumeric string with no spaces.

  14. In the configuration area, specify the required information by filling in parameter values in the text fields in the right column.
  15. If you do not want to set any restrictions on a particular parameter, leave its value field blank.

  16. Click OK.
  17. You are returned to the Policy Rules Management tab.

  18. If required, click Reorder and order the rules as appropriate following the information provided in "Reordering Policy Rules".
Deleting a Policy Rule

You can delete any unwanted policy rules from the CMS configuration. If you think you might need a rule in the future, instead of deleting it from the configuration you should disable it by setting the enable parameter value to false. In this way, you can avoid re-creating the rule in the future. Because all three subsystems subject end-entity requests only to rules that are currently enabled (see "Policy Processor"), keeping unwanted rules in disabled state in the configuration does not affect policy decisions made by a subsystem.

To delete a policy rule from the CMS configuration:

  1. Access the CMS window (see "Accessing the CMS Window").
  2. Click the Configuration tab.
  3. In the navigation tree, choose the subsystem to which the policy rule you want to delete belongs.
  4. Click Policies.
  5. The Policy Rules Management tab appears. It lists the currently configured policy rules. For information about this tab, see "Policy Rules Management Tab".

  6. In the Rule Name list, select the rule you want to delete and click Delete.
  7. When prompted, confirm the delete action.
  8. The CMS configuration is modified. If the changes you made require you to restart the server, you will be prompted accordingly. In that case, restart the server.

Modifying a Policy Rule

Modifying a policy rule involves changing its configuration parameter values; you cannot change the name of a rule. To change the name of a rule, create a new policy rule using the same policy plug-in module (that you used to create the rule you want to rename) with the same parameter values, and delete the old one.

As a part of modifying a rule, you can change its status from enabled to disabled or vice versa by changing the value of the enable parameter from true to false or vice versa. A subsystem subjects end-entity requests only to rules that are enabled.

During installation, the Certificate Manager and Registration Manager create default policy rules. Table 16.1 lists these rules. After installation, you must verify whether you want to use these rules, check how these rules are configured, and make the appropriate configuration changes. If you don't want to use a rule, delete it from the configuration following the instructions in "Deleting a Policy Rule". If you want to create a new rule, follow the instructions in "Adding a Policy Rule".

Table 16.1 Default policy rules created for a Certificate Manager and Registration Manager

Policy rule name
Policy plug-in module name
AuthorityKeyIdentifierExt

AuthorityKeyIdentifierExt
See "Authority Key Identifier Extension Policy".

BasicConstraintsExt

BasicConstraintExt
See "Basic Constraints Extension Policy".

DefaultRenewalValidityRule

RenewalValidityConstraints
See "Renewal Validity Constraints Policy".

DefaultRevocationRule

DefaultRevocation
See "Default Revocation Policy".

DefaultValidityRule

ValidityConstraints
See "Validity Constraints Policy".

DSAKeyRule

DSAKeyConstraints
See "DSA Key Constraints Policy".

KeyAlgRule

KeyAlgorithmConstraints
See "Key Algorithm Constraints Policy".

KeyUsageExt

KeyUsageExt
See "Key Usage Extension Policy".

NSCertTypeExt

NSCertTypeExt
See "Netscape Certificate Type Extension Policy".

RSAKeyRule

RSAKeyConstraints
See "RSA Key Constraints Policy".

SubjectAltNameExt

SubjectAltNameExt
See "Subject Alternate Name Extension Policy".

SubjectKeyIdentifierExt

SubjectKeyIdentifierExt
See "Subject Key Identifier Extension Policy".

To modify a policy rule in the CMS configuration:

  1. Access the CMS window (see "Accessing the CMS Window").
  2. Click the Configuration tab.
  3. In the navigation tree, choose the subsystem to which the policy rule you want to modify belongs.
  4. Click Policies.
  5. The Policy Rules Management tab appears. It lists the currently configured policy rules. For information about this tab, see "Policy Rules Management Tab".

  6. In the Rule Name list, select the rule you want to modify and click Edit.
  7. The Configure Policy Parameters window appears, showing how this rule is currently configured. An example is shown below. For more information on how this window functions, see "Policy Rule Editor".

  8. Make the necessary changes by filling in parameter values in the text fields in the right column.
  9. If you do not want to set any restrictions on a particular parameter, leave its value field blank.

  10. Click OK.
  11. You are returned to the Policy Rules Management tab.

  12. If required, click Reorder and order the rules as appropriate following the information provided in "Reordering Policy Rules".
Reordering Policy Rules

For maintaining priority levels, Certificate Management System supports a linear list of policy rules in increasing order of priority. This means that for a given policy category in the configuration file, a policy configuration with a lower priority precedes one with a higher priority. This simple linear listing avoids the need to have explicit locking on request attributes to prevent conflicting changes. By ordering the rules, you introduce a concurrency control whereby a higher-priority rule configuration overwrites any changes made by a lower-priority rule configuration that precedes it.

You may want to specify policies at different priority levels for the same operation depending on the end-entity information. For example, authentication policies, if any, need to precede others in the list.

To reorder policy rules in the CMS configuration:

  1. Access the CMS window (see "Accessing the CMS Window").
  2. Click the Configuration tab.
  3. In the navigation tree, choose the subsystem.
  4. Click Policies.
  5. The Policy Rules Management tab appears. It lists the currently configured policy rules. For more information about this tab, see "Policy Rules Management Tab".

  6. Click Reorder.
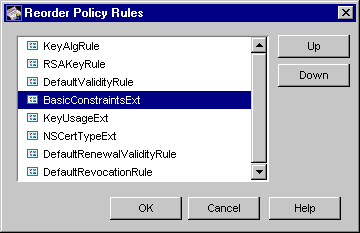
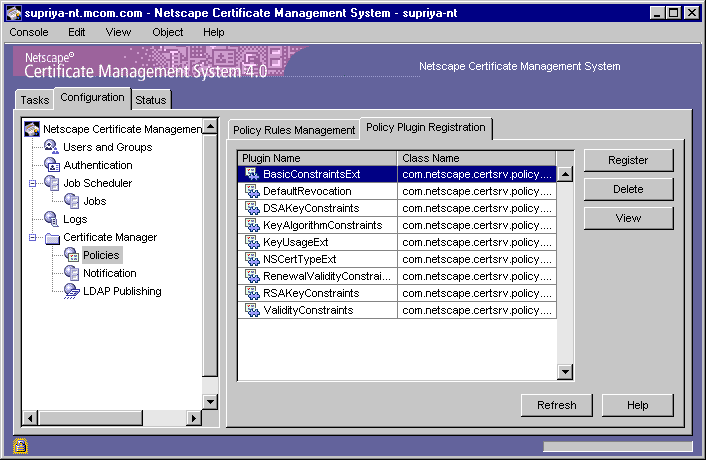
  7. The Reorder Policy Rules window appears. It lists the currently registered policy plug-in modules in the order in which they are executed by the subsystem; the server executes the rules on a first-come-first-served basis, overwriting the configuration determined by the previous rule, if any.

  8. To change the order of a rule, select it in the list and click the Up or Down button, as appropriate.
  9. When you have the correct order, click OK.
  10. You are returned to the Policy Rules Management tab.

  11. To view the updated configuration, click Refresh.

Managing Policy Plug-in Modules
This section explains how to use the CMS window to perform the following operations:

For information on adding or changing policy-specific information in the configuration file, see "Policy Parameters in the Configuration File".

Registering a Policy Plug-in Module

You can register custom policy plug-in modules from the CMS window. Before registering a plug-in module, be sure to put the Java class for the plug-in in the classes directory.

To register a policy plug-in module in a subsystem's policy framework:

  1. Access the CMS window (see "Accessing the CMS Window").
  2. Click the Configuration tab.
  3. In the navigation tree, choose the subsystem that will use the plug-in module you want to register.
  4. Click Policies.
  5. The Policy Rules Management tab appears. It lists the currently configured policy rules.

  6. Click the Policy Plugin Registration tab.
  7. The Policy Plugin Registration tab appears. It lists the currently registered policy plug-in modules. For information about this tab, see "Policy Plugin Registration Tab".

  8. Click Register.
  9. The Register Policy Plugin Implementation window appears. For information on how this window works, see "Policy Plug-in Registration Editor".

  10. Specify information as appropriate:
  11. Plugin name. Type the name of the plug-in.

    Class name. Type the full name of the class for this plug-in--that is, the path to the implementing Java class. If this class is part of a package, be sure to include the package name. For example, if you are registering a class named myPolicy and if this class is in a package named com.myCompany, type com.myCompany.myPolicy.

  12. Click OK.
  13. You are returned to the Policy Plugin Registration tab.

  14. To view the updated configuration, click Refresh.
Deleting a Policy Plug-in Module

You can delete unwanted policy plug-in modules using the CMS window. Before deleting a plug-in module, be sure to delete all the policy rules that are based on this plug-in module; see "Deleting a Policy Rule".

To delete a policy plug-in module from a subsystem's policy framework:

  1. Access the CMS window (see "Accessing the CMS Window").
  2. Click the Configuration tab.
  3. In the navigation tree, choose the subsystem that registers the plug-in module you want to delete.
  4. Click Policies.
  5. The Policy Rules Management tab appears. It lists the currently configured policy rules.

  6. Click the Policy Plugin Registration tab.
  7. The Policy Plugin Registration tab appears. It lists the currently registered policy plug-in modules. For information about this tab, see "Policy Plugin Registration Tab".

  8. In the Plugin Name list, select the plug-in you want to delete and click Delete.
  9. When prompted, confirm the delete action.
 

© Copyright 1999 Netscape Communications Corp., a subsidiary of America Online, Inc. All rights reserved.