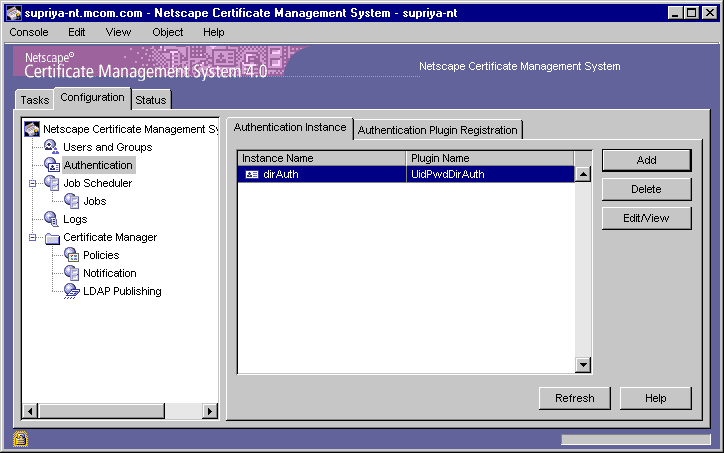
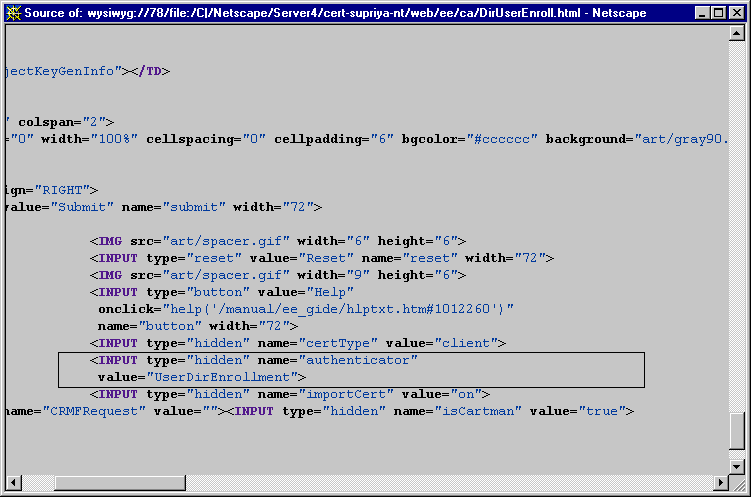
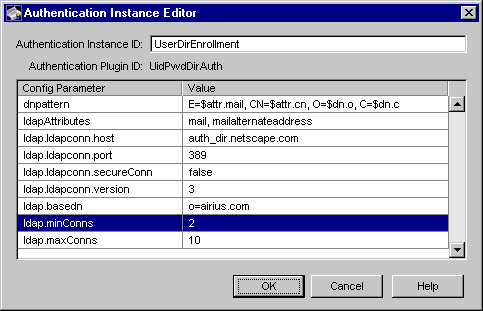
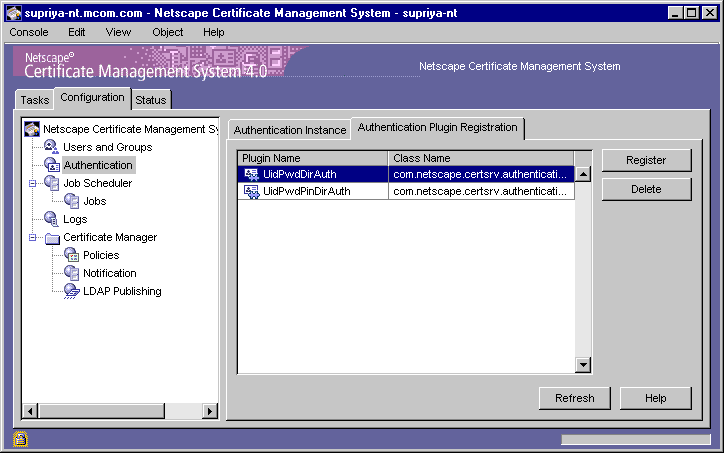
Complete Contents
About This Guide
PART 1: Netscape Certificate Management System
Chapter 1: Introduction to Certificate Management System
Chapter 2: Administration Tasks and Tool
Chapter 3: Configuration
PART 2: Managing Certificate Management System
Chapter 4: Installing and Uninstalling Instances
Chapter 5: Starting and Stopping Instances
PART 3: System-Level Configuration
Chapter 6: Configuring Ports, Database, and SMTP Settings
Chapter 7: Managing Privileged Users and Groups
Chapter 8: Keys and Certificates
PART 4: Authentication
Chapter 9: Introduction to Authentication
Chapter 10: Using the PIN Generator Tool
Chapter 11: Configuring Authentication for End Entities
Chapter 12: Developing Authentication Plug-ins
PART 5: Job Scheduling and Notification
Chapter 13: Introduction to Job Scheduling and Notifications
Chapter 14: Configuring Jobs
PART 6: Policies
Chapter 15: Introduction to Policies
Chapter 16: Configuring Policies
PART 7: LDAP Publishing
Chapter 17: Introduction to LDAP Publishing
Chapter 18: Configuring Subsystems for LDAP Publishing
Chapter 19: Publishing CRLs
PART 8: Agent and End-Entity Interfaces
Chapter 20: Introduction to End-Entity and Agent Interfaces
Chapter 21: Customizing End-Entity and Agent Interfaces
PART 9: Logs
Chapter 22: Introduction to Logs
Chapter 23: Managing Logs
PART 10: Issuance and Management of End-Entity Certificates
Chapter 24: Issuing and Managing End-Entity Certificates
Chapter 25: Recovering Encrypted Data
PART 11: Appendixes
Appendix A: Distinguished Names
Appendix B: Backing Up and Restoring Data
Appendix C: Command-Line Utilities
Appendix D: Certificate Database Tool
Appendix E: Key Database Tool
Appendix F: Netscape Signing Tool
Appendix G: SSL Strength Tool
Appendix H: SSL Debugging Tool
Previous Next Contents Index Bookshelf


Chapter 11 Configuring Authentication for End Entities

Netscape Certificate Management System (CMS) provides a customizable authentication subsystem that supports various mechanisms for authenticating end entities. This chapter explains how to configure Certificate Management System to use specific authentication plug-in modules for authenticating end entities during certificate enrollment. The chapter also shows how end-entity authentication plug-in implementations and configured instances appear in the configuration file.

Before reading this chapter, you should have read the chapter "Introduction to Authentication". In particular, you should be familiar with the various plug-in modules for authenticating end entities that come with Certificate Management System. If you are not, see "End-Entity Authentication During Certificate Enrollment".

This chapter has the following sections:


Authentication Management
You can manage end-entity authentication in two ways:

The recommended method is to use the CMS window.

Authentication Management from the CMS Window

Figure 11.1 shows the CMS window, which provides the required user interface to support authentication management for end entities.

Figure 11.1 Authentication information in the CMS window

In the CMS window you will find a single Authentication object. This object represents the authentication plug-in implementations and instances (for end entities) currently recognized by this instance of Certificate Management System. From this window you can accomplish the following operations:

The sections that follow describe the parts of the window from which you carry out these operations.

Authentication Instance Tab

The Authentication Instance tab lists the currently configured authentication instances, so that you can manage them at a single place. From this tab you can perform the following operations:

Add. The add operation shows a list of registered authentication plug-in modules from which you can select the one you want to configure. You can configure the selected module with the help of the authentication instance editor (see "Authentication Instance Editor"). When you save the changes, Certificate Management System creates the new authentication instance and displays it in the list of authentication instances. For instructions on adding new authentication instances, see "Adding an Authentication Instance".

Delete. The delete operation allows you to remove unwanted authentication instances from the CMS configuration. For instructions on deleting authentication instances, see "Deleting an Authentication Instance".

Edit/View. The edit operation allows you to view and modify the configuration parameter values of currently configured authentication instances. You modify the parameter values with the help of the authentication instance editor (see "Authentication Instance Editor"). For instructions on modifying authentication instances, see "Modifying an Authentication Instance".

Authentication Instance Editor

The authentication instance editor is designed to be generic. Its simple graphical interface enables you to create new instances and modify the configuration of an individual authentication instance. When you are adding a new instance, the editor shows the configuration parameters pertaining to the plug-in module you selected. When you are modifying an instance, the editor shows the configuration parameters pertaining to the instance you selected.

All configurable parameters are displayed in the form of a table with two columns and multiple rows, each parameter occupying a row in the table. The left column lists the names of the configurable parameters; the right column is designated for entering the appropriate values. The ordering of the configurable parameters is irrelevant unless it is defined by the authentication plug-in implementation.

The authentication instance editor provides normal save, cancel, and help functionality. You can specify names for authentication instances, but only at the time of adding new ones; you cannot change names later.

Authentication Plugin Registration Tab

The Authentication Plugin Registration tab lists the currently registered authentication plug-in implementations for the selected CMS instance and gives you access to the window from which you can register new authentication plug-in modules. On this tab you will find the names of registered plug-in modules listed on the left and the path to the Java class that implements the plug-in module listed on the right.

You can perform the following operations from this tab:

Register. This operation allows you to register a new authentication plug-in module. You do this with the help of the authentication registration editor (see "Authentication Plug-in Registration Editor").

When you save the changes, Certificate Management System loads the authentication plug-in implementation and displays it in the list of registered plug-ins. For instructions on registering new authentication plug- in modules, see "Registering an Authentication Plug-in Module".

Delete. This operation allows you to remove unwanted authentication plug-in modules from the CMS framework. For instructions on deleting authentication plug-in modules, see "Deleting an Authentication Plug-in Module".

Authentication Plug-in Registration Editor

The authentication plug-in registration editor allows you to register new authentication plug-in modules in the CMS authentication framework. Registering a new authentication plug-in module involves specifying the name of the plug-in module and the full name of the Java class that implements the authentication interface (implementation must be on the class path).

For example, you can add an authentication implementation named as follows:

com.netscape.authentication.ssnAuth

Authentication Parameters in the Configuration File

The sample shown in Figure 11.2 illustrates how authentication-specific information appears in the configuration file. Keep the following points in mind:

To change the configuration by editing the configuration file, follow the instructions in "Changing the Configuration by Editing the Configuration File".

Authentication Plug-in Implementation and Instance

Authentication managers are implemented as Java classes, which are then registered with Certificate Management System as plug-ins. You can use a given implementation of an end-entity authentication plug-in module and configure multiple instances of it. Each instance must have a unique name (an alphanumeric string with no spaces) and can contain different input parameter values to apply to different end-entity enrollment requests. In other words, a given end-entity authentication implementation can be shared by multiple configurations. You can also distinguish the applicability of configured instances by including appropriate instance names.

For example, you can configure the UidPwdDirAuth plug-in module so that it authenticates users in two different directories. The figures that follow illustrate this capability. The plug-in named UidPwdDirAuthentication has been used to create two authentication instances, ee_dir_auth_mgr1 and ee_dir_auth_mgr2, each of which authenticates end entities in a specific directory.

Figure 11.3 shows the two instances, both based on the same plug-in module, in the CMS window.

Figure 11.3 Authentication instances for two directories (CMS window)

Figure 11.4 shows the two authentication instances, both based on the same plug-in module, in the configuration file.

Figure 11.4 Authentication instances for two directories (configuration file)


Managing Authentication Instances
This section explains how to use the CMS window to perform the following operations:

For information on adding or changing authentication-specific information in the configuration file, see "Authentication Parameters in the Configuration File".

Adding an Authentication Instance

Adding an authentication instance to the CMS configuration involves creating a new instance of an already registered plug-in module, assigning a unique name (an alphanumeric string with no spaces) to the instance, and entering appropriate values for the parameters that define the plug-in implementation you want to create an instance of.

When you add an authentication instance, the CMS configuration is updated with authentication-specific information only. The server does not associate the authentication instance you added with any of the end-entity enrollment forms; that is, the end-entity servlets that should use this authentication instance are not configured yet. For the new authentication instance to work with end-entity enrollment forms, you must update the appropriate forms, as follows:

Table 11.1 Default authentication instance names embedded in enrollment forms

Enrollment form (filename)
Authentication instance name
Directory-based enrollment for end users (DirUserEnroll.html)

UserDirEnrollment
Directory- and PIN-based enrollment for end users (DirPinUserEnroll.html)

PinDirEnrollment
Directory-based enrollment for servers (DirServerEnroll.html)
serverDirEnrollment

Figure 11.5 shows the default directory-based enrollment form configured to use an authentication instance identified as UserDirEnrollment.

Figure 11.5 Authentication information in the default directory-based enrollment form

For information on locating and customizing the default end-entity forms, see "Summary of End-Entity Forms and Templates".

Note If you do not configure Certificate Management System to use any of the authentication plug-in modules listed in the Authentication Plugin Registration tab, the server uses manual authentication for end-entity enrollment. This means that all end-entity enrollment requests are queued for agent approval. For more information, see "Manual Authentication".

To add an authentication instance to the CMS configuration:

  1. Access the CMS window (see "Accessing the CMS Window").
  2. Click the Configuration tab.
  3. In the navigation tree, click Authentication.
  4. The right pane shows the Authentication Instance tab, which lists any currently configured authentication instances. For information about this tab, see "Authentication Instance Tab".

  5. Click Add.
  6. The Select Authentication Plugin Implementation window appears. It lists the currently registered authentication plug-in modules.

  7. Select a plug-in module.
  8. The following choices are the ones provided out of the box with Certificate Management System (they are described in "End-Entity Authentication During Certificate Enrollment"). If you have registered any custom authentication plug-in modules, they too will be available for selection.

    For the purposes of this instruction, assume that you selected UidPwdPinDirAuth.

  9. Click Next.
  10. The Configure Authentication Instance Parameters window appears. It lists the configuration information required for this authentication instance. For more information on how this window functions, see "Authentication Instance Editor".

  11. In the Authentication Instance ID field, type a unique name for this instance that will help you identify it.
  12. For the name, be sure to use an alphanumeric string with no spaces.

  13. In the configuration area, specify the required information by filling in parameter values in the corresponding text fields (the right column).
  14. If you do not want to set any restrictions on a particular parameter, leave its value field blank.

  15. Click OK.
  16. The CMS configuration is modified. If the changes you made require you to restart the server, you will be prompted accordingly. In that case, restart the server.

Deleting an Authentication Instance

You can delete any unwanted authentication instances from the CMS configuration. If you delete an authentication instance, the associated end-entity enrollment forms, if used, fail to authenticate end entities. If you want these forms to work with other authentication instances, make the appropriate changes to the forms; see "Step 5. Customize the End-Entity Enrollment Forms".

To delete an authentication instance from the CMS configuration:

  1. Access the CMS window (see "Accessing the CMS Window").
  2. Click the Configuration tab.
  3. In the navigation tree, click Authentication.
  4. The right pane shows the Authentication Instance tab, which lists currently configured authentication instances. For information about this tab, see "Authentication Instance Tab".

  5. In the Instance Name list, select the instance you want to delete and click Delete.
  6. When prompted, confirm the delete action.
  7. The CMS configuration is modified. If the changes you made require you to restart the server, you will be prompted accordingly. In that case, restart the server.

Modifying an Authentication Instance

Modifying an authentication instance involves changing its configuration parameter values; you cannot change the name of an instance. To change the name of an instance, create a new instance using the same authentication plug-in module that you used to create the instance you want to rename, with the same parameter values, and delete the old one.

When you modify an authentication instance, the CMS configuration gets updated with authentication-specific information. Because you are not changing the name of the authentication instance, you do not have to make any changes to the end-entity servlet configuration.

To modify an authentication instance in the CMS configuration:

  1. Access the CMS window (see "Accessing the CMS Window").
  2. Click the Configuration tab.
  3. In the navigation tree, click Authentication.
  4. The right pane shows the Authentication Instance tab, which lists currently configured authentication instances.

  5. In the Instance Name list, select the instance you want to modify and click Edit.
  6. The Configure Authentication Instance Parameters window appears, showing the current configuration of this instance. For more information on how this window functions, see "Authentication Instance Editor".

  7. Make the necessary changes by filling in parameter values in the corresponding text fields (the right column).
  8. If you do not want to set any restrictions on a particular parameter, leave its value field blank.

  9. Click OK.
  10. The CMS configuration is modified. If the changes you made require you to restart the server, you will be prompted accordingly. In that case, restart the server.


Managing Authentication Plug-in Modules
This section explains how to use the CMS window to perform the following operations:

For information on adding or changing authentication-specific information in the configuration file, see "Authentication Parameters in the Configuration File".

Registering an Authentication Plug-in Module

You can register custom authentication plug-in modules from the CMS window. Before registering an authentication plug-in, be sure to put the Java class for the plug-in module in the classes directory; see "Compiling and Installing Authentication Manager Plug-ins".

To register an authentication plug-in module in the CMS authentication framework:

  1. Access the CMS window (see "Accessing the CMS Window").
  2. Click the Configuration tab.
  3. In the navigation tree, click Authentication, and in the right pane, click the Authentication Plugin Registration tab.
  4. The Authentication Plugin Registration tab lists currently registered plug-in modules. For information about this tab, see "Authentication Plugin Registration Tab".

  5. Click Register.
  6. The Register Authentication Plugin Implementation window appears. For information on how this window works, see "Authentication Plug-in Registration Editor".

  7. Specify the appropriate information:
  8. Plugin name. Type the name of the plug-in module.

    Class name. Type the full name of the class for this plug-in module--that is, the path to the implementing Java class. If this class is part of a package, be sure to include the package name. For example, if you are registering a class named NISAuth and if this class is in a package named com.mycompany, type com.mycompany.NISAuth.

  9. Click OK.
  10. The CMS configuration is modified. If the changes you made require you to restart the server, you will be prompted accordingly. In that case, restart the server.

Deleting an Authentication Plug-in Module

You can delete unwanted authentication plug-in modules by using the CMS window. Before deleting a plug-in module, be sure to delete all the instances that are based on this plug-in; see "Deleting an Authentication Instance". You should also update the appropriate end-entity enrollment forms.

To delete an authentication plug-in module from the CMS authentication framework:

  1. Access the CMS window (see "Accessing the CMS Window").
  2. Click the Configuration tab.
  3. In the navigation tree, click Authentication, and in the right pane, click the Authentication Plugin Registration tab.
  4. The Authentication Plugin Registration tab lists currently registered plug-in modules. For information about this tab, see "Authentication Plugin Registration Tab".

  5. In the Plugin Name list, select the plug-in module you want to delete and click Delete.
  6. When prompted, confirm the delete action.
  7. The CMS configuration is modified. If the changes you made require you to restart the server, you will be prompted accordingly. In that case, restart the server.


© Copyright 1999 Netscape Communications Corp., a subsidiary of America Online, Inc. All rights reserved.