

 his chapter tells you how to begin using your Netscape Collabra Server. It describes how to install, upgrade, start, stop, uninstall, and remove your server. It also discusses the information that you need to know before installing your server. This chapter describes the following tasks:
directory
/etc/services on the server machine.
NoteMost ports under 1024 are reserved for specific uses. If you choose a port number less than 1024 for either the administration server or the Collabra Server, you must start that server as the root user. If you plan to install a server on a port number less than 1024, you must be logged in as root during the installation process.
Note
To install Netscape Navigator:
cd solaris.
nav301 directory on the CD-ROM.
netscape.tar file from the CD-ROM to a staging directory on your local disk.
netscape.tar file by typing: tar xvf netscape.tar
./ns-setup to start the Navigator installation.
Note
If you are using Netscape Directory Server version 1.02 or greater as your directory service, install the directory server before installing the Collabra Server. For information on installing the directory server, see the Netscape Directory Server 1.02 readme. You can run the SuiteSpot Integration tool before installing the Collabra Server to automatically generate configuration information necessary to the Collabra Server installation process. For more information on the SuiteSpot Integration tool, see the Netscape Directory Server 1.02 readme.
The Collabra Server installation program automatically installs an administration serverTo install Netscape Collabra Server:
cd solaris.
collabra3.0 directory on the CD-ROM.
collabra.tar file from the CD-ROM to a staging directory on your local disk.
collabra.tar file by typing: tar xvf collabra.tar
./ns-setup to start the server installation. If you aren't logged in as root or if you don't have write permissions, you'll get one or more error messages. You are now ready for the QuickStart installation program.
Note:
If you installed Netscape Directory Server 1.02 or Netscape News Server 2.x on the same machine, you must install the Collabra Server into a different server root. These servers install and use a different version of the administration server from Collabra Server 3.0.
You may now start the administration server to begin administering your Collabra Server.
Warning!
The Access Control model for Collabra Server 3.0 has changed, therefore, at the completion of the upgrade process, you will need to manually migrate your 2.x access control rules into your new 3.0 server. For more information on manually migrating your 2.x access control rules into your 3.0 server, see "Migrating access control rules" on page 21.
To upgrade a 2.x Netscape News Server:
WarningUninstalling or removing your 2.x server will remove your 2.x spool if it is located under your 2.x server root. Therefore, you should not uninstall or remove your 2.x server if your 3.0 server points to the same spool. If you must uninstall or remove your 2.x server, you must first copy the spool to a new location (not in your 2.x server root) and then change the spool location of the 3.0 server. The instructions for changing the spool location of the 3.0 server are discussed in the Collabra Server Administrator's Guide.
WarningIf you leave both the 2.x and 3.0 server pointing to the same article spool, Netscape recommends that you do not restart your 2.x server. If you need to switch back and forth between 2.x and 3.0 servers that share the same spool, be aware of the following:
logs directory must be synchronized with your spool at all times.
logs directory of the server that last updated the spool should be copied to the server you are about to start. If you do not copy the logs directory, your messages will not be synchronized with your message headers.
logs directory:
You migrate your 2.x server to a 3.0 server and leave them pointing to the same spool. You then decide to restart your 2.x server while configuring your 3.0 server. Your 2.x server has now updated the spool. Before starting your new 3.0 server, you need to copy the
logs directory of the 2.x server to the 3.0 server. You will also need to import the active file manually as described in the final bullet below.After migrating, you let your 3.0 server run. Your 3.0 server has now updated the spool. Before you restart the 2.x server that is pointing to the same spool, you need to copy the
logs directory of the 3.0 server back to the 2.x server. After migrating and running your 3.0 server, you decide to remigrate your original 2.x server. Before doing so, you should copy the
logs directory of the 3.0 server back to the 2.x server.
logs directory) into the 3.0 server. However, if you need to copy the logs directory from the 2.x server to the 3.0 server, you need to import the active file manually after you have copied the logs directory.
logs directory. Be sure to keep the original active file intact.


/authdb/2.x server database name directory:
NoteIn the following list, the 2.x server database is the name of the database that the 2.x News Server was using. The 3.x server database is the directory service that the Collabra Server is using (either the local directory service or a remote directory server). The 3.x server root is the directory where the Collabra Server is installed. The LDAP server can be a local directory service or a remote directory server.
User.ldif file contains the user entries successfully created in the LDAP server during the migration of the 2.0 user database to the 3.0 server database. If these user entries are deleted from the LDAP server, you can use the ldapmodify command in the 3.x server root/userdb/ldap/tools directory to import this file into an LDAP server and recreate the entries. You can also use the import this file by choosing Users & Groups|Import from the Server Administration page.
UserDel.ldif file can be used with the ldapmodify command to delete all the user entries created during the migration of 2.0 user database to the LDAP server.
UserDup.ldif file contains the user entries that couldn't be created because they already exist in the LDAP server. To import these entries, you need to modify the UserDup.ldif file and import it using the ldapmodify command or the Import Directory Information form.
Group.ldif file contains the group entries successfully created in the LDAP server during the migration of the 2.0 group database to the 3.x server database. If these group entries are deleted from the LDAP server, you can use either the ldapmodify command or the Import Directory Information form to import this file into an LDAP server and recreate the entries.
GroupDel.ldif file can be used with the ldapmodify command to delete all the group entries created during the migration of the 2.0 group database to the 3.x server database.
GroupDup.ldif file contains the group entries which couldn't be created because they already existed in the LDAP server. To import these entries, you will have to modify this file and import it using the ldapmodify command or the Import Directory Information form.
GroupMod.ldif file contains the group membership information which was not migrated from the 2.0 group database to the LDAP server. The user entries in this file couldn't be created in the LDAP server and therefore the group membership for those users was also not migrated to the LDAP server. To migrate these user entries and their corresponding group membership information, you need to create the user entries, modify the GroupMod.ldif file to reflect the correct user information and import this file using the ldapmodify command or the Import Directory Information form. Refer to the UsersDup.ldif file to look at the user entries which couldn't be created.
importdb file contains a sample invocation of the ldapmodify command to import an .ldif file in the LDAP server.
secnews2.netscape.com. If you are installing a second server for a custom domain, enter the domain here.
119. For more information on installing additional servers on different ports, see "Installing multiple server instances on different ports" on page 25.
./start-admin.
http://servername.sub_domain.domain:port_number
Stopping the administration server
To stop the administration server:
./stop-admin.
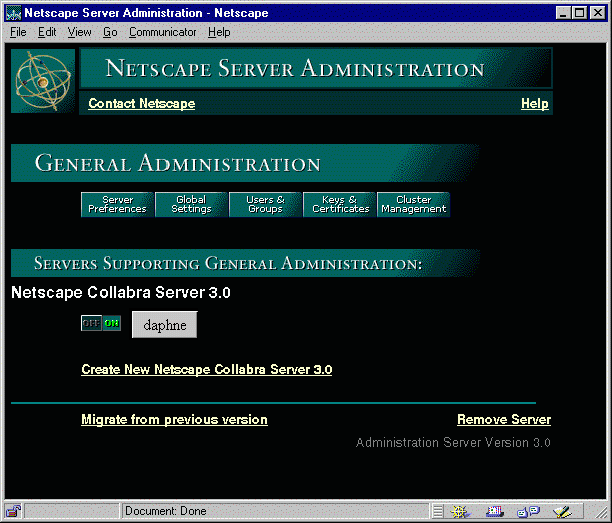
 Server Administration page
Using the Server Administration page
From the Server Administration page, you can start the Collabra Server by using one of the following options:
Option 1
 Select the On/Off toggle button next to the server you wish to start.
 Option 2
NoteIf your Collabra Server is installed on a port number less than 1024, you need to be running as root to start the server manually. Run the
start script found in the server root/news-name directory where server root is the directory where your Collabra Server is installed and name is the name of your server.
 Select the On/Off toggle button next to the server you wish to start.
stop script found in the server root/news-name directory where server root is the directory where your Collabra Server is installed and name is the name of your server.